ESP32 and ESP8266 boards are a great combination when used with Telegram. You can send data to your smartphone in a flash and control your microcontroller from there.
In this project, you’ll build a trail camera with a special ESP32 board – the ESP32-CAM. This camera is triggered when someone moves in front of it. It then takes a photo and immediately sends it to your smartphone.
For this project you need:
- ESP32-Cam Module (AI Thinker)
- PIR Motion Sensor
- FT232RL USB to TTL Serial Adapter
Before you can get started, you need to spend a few minutes on preparations.
Preparing Telegram
First, you need an account with Telegram – and the corresponding app for your smartphone or computer. In the following, we’ll use a smartphone. Telegram is free, ad-free, and works similarly to WhatsApp. However, here you have the option to create bots that you can interact with.
In this tutorial on Pollux Labs, you’ll learn how to create your own Telegram bot.
Setting up the Trail Camera
Unfortunately, the ESP32-CAM doesn’t have a USB port, so you need to use an FTDI adapter to upload sketches. If you haven’t gained any experience here yet, check out this tutorial on how to program the ESP32-CAM.
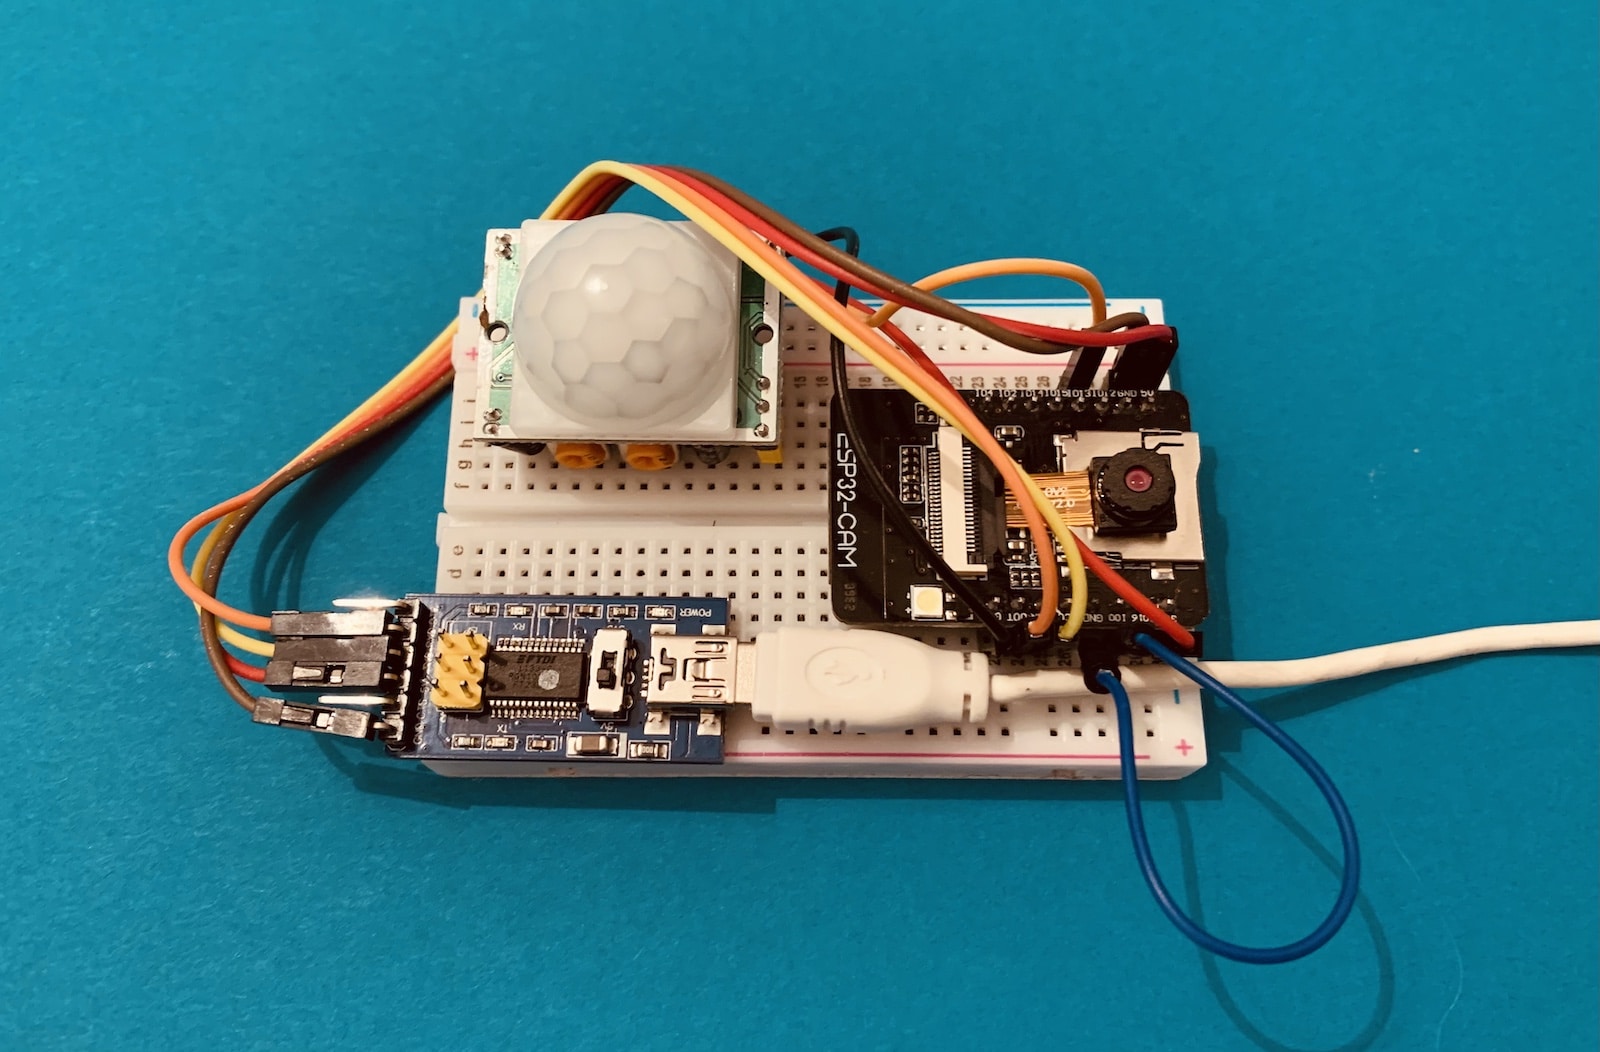
Once you’ve connected the USB/Serial adapter, all that’s missing is the motion sensor. In this project, we use the PIR sensor HC-SR501, for which you only need one data pin.
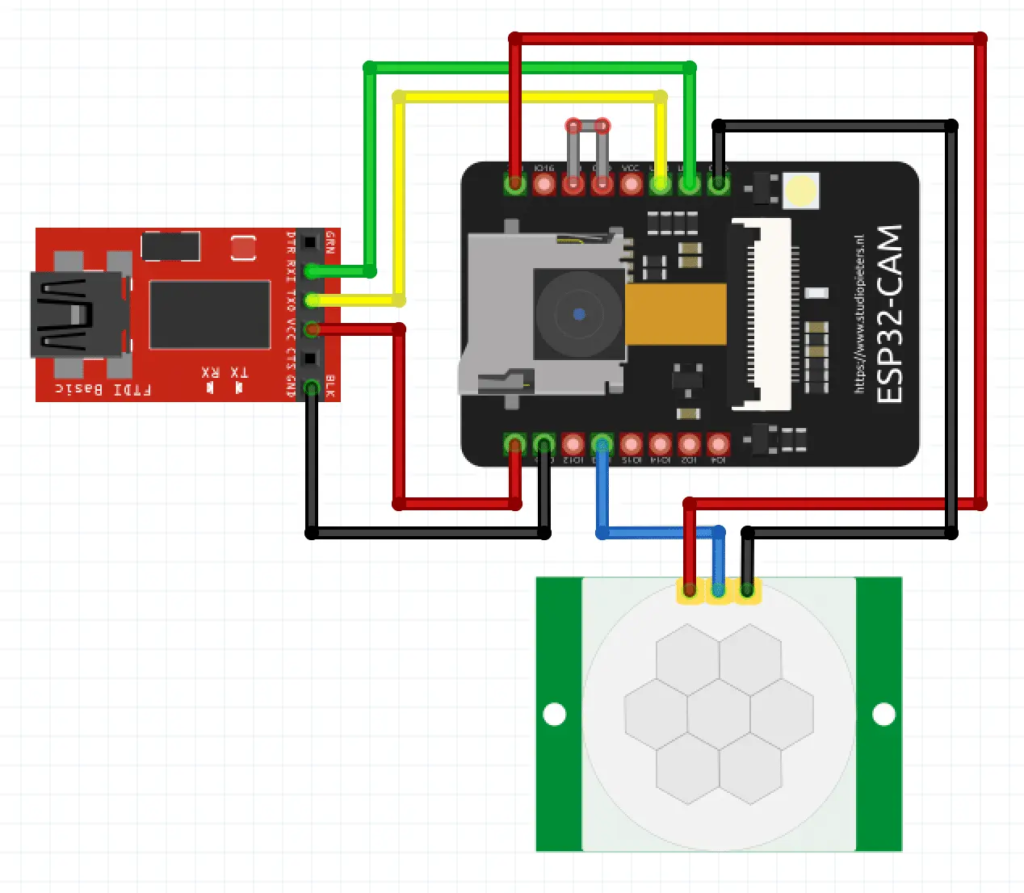
Refer to this diagram for the setup:

___STEADY_PAYWALL___
Here are the connections clearly presented once again:
| FTDI Adapter | ESP32-CAM |
| GND | GND |
| VCC | 5V |
| TXD | U0R |
| RXD | U0T |
| HC-SR501 | ESP32-CAM |
| VCC | 3v3 |
| GND | GND |
| OUT | GPIO 13 |
Note: In the diagram above, you’ll find a bridge in gray – always remember that you need this to upload a sketch. Once the code is on your ESP32-CAM, disconnect the bridge and press the RESET button on the board. Only then will your sketch start.
The Appropriate Housing
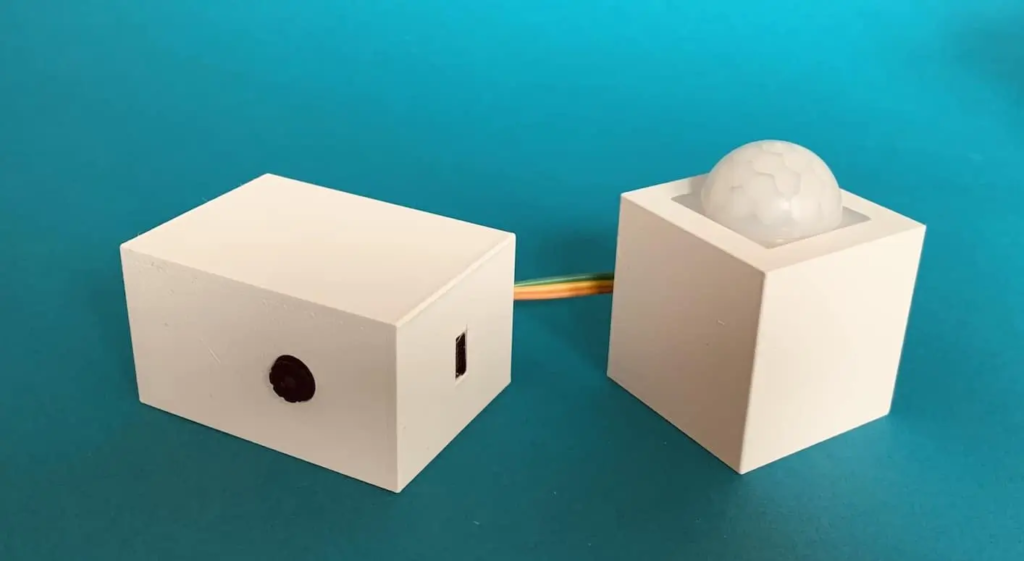
Do you want to set up the trail camera discreetly? Or does a breadboard not fit into the surrounding room design? Then our housings are the right choice:

You can download the .STL files for the housings here on our site.
The Sketch
For this project, we’ve taken a sketch from Random Nerd Tutorials as a starting point and expanded it. Rui Santos uses the ESP32-CAM here to save a photo to an SD card when motion is detected.
We have modified the setup and the code so that your board sends the photo to your Telegram bot, i.e., to your smartphone, as soon as movement is detected.
Important Adjustments in the Trail Camera Code
For the sketch to work for you, you need to adjust a few small things. First, enter the access data for your WiFi network so that the ESP32-CAM can connect to it.
Then you need your token and the UserID that you received when creating your Telegram bot.
const char* ssid = "NETWORK";
const char* password = "PASSWORD";
String BOTtoken = "TOKEN";
String CHAT_ID = "USER ID";
A special feature that you can adjust according to your wishes is the time between photos. In the loop, you’ll find a delay() of 20 seconds. This is the time span in which the motion sensor doesn’t register any further movement after sending a photo.
The shorter you set this time span, the more photos you’ll receive – provided someone continues to move in front of the trail camera.
You can also adjust the sensitivity of your HC-SR501. You’ll find two potentiometers on it: If you turn the board upwards, you can adjust the sensitivity on the left one. Experiment a bit here to find the right setting for you.
The UniversalTelegramBot Library
The UniversalTelegramBot.h library handles communication with your Telegram bot. You can find it in the library manager of the Arduino IDE.
A note: This project is for experimenting. If you want to use the trail camera productively, think about IT security beforehand and make sure not to violate any personal rights!
Here’s the complete sketch for copying:
/*
  Rui Santos
  Complete project details at https://RandomNerdTutorials.com/telegram-esp32-cam-photo-arduino/

  Permission is hereby granted, free of charge, to any person obtaining a copy
  of this software and associated documentation files.

  The above copyright notice and this permission notice shall be included in all
  copies or substantial portions of the Software.

  Adapted by Pollux Labs – https://en.polluxlabs.net
*/

#include <Arduino.h>
#include <WiFi.h>
#include <WiFiClientSecure.h>
#include "soc/soc.h"
#include "soc/rtc_cntl_reg.h"
#include "esp_camera.h"
#include <UniversalTelegramBot.h>

const char* ssid = "NETWORK";
const char* password = "PASSWORD";

// Initialize Telegram BOT
String BOTtoken = "TOKEN";  // dein Bot-Token vom Botfather)

// Trage hier deine User-ID ein
String CHAT_ID = "CHAT-ID";

bool sendPhoto = false;

WiFiClientSecure clientTCP;
UniversalTelegramBot bot(BOTtoken, clientTCP);

//Pin of the motion sensor
#define PIR_PIN 13

//CAMERA_MODEL_AI_THINKER
#define PWDN_GPIO_NUM     32
#define RESET_GPIO_NUM    -1
#define XCLK_GPIO_NUM      0
#define SIOD_GPIO_NUM     26
#define SIOC_GPIO_NUM     27

#define Y9_GPIO_NUM       35
#define Y8_GPIO_NUM       34
#define Y7_GPIO_NUM       39
#define Y6_GPIO_NUM       36
#define Y5_GPIO_NUM       21
#define Y4_GPIO_NUM       19
#define Y3_GPIO_NUM       18
#define Y2_GPIO_NUM        5
#define VSYNC_GPIO_NUM    25
#define HREF_GPIO_NUM     23
#define PCLK_GPIO_NUM     22


void configInitCamera() {
  camera_config_t config;
  config.ledc_channel = LEDC_CHANNEL_0;
  config.ledc_timer = LEDC_TIMER_0;
  config.pin_d0 = Y2_GPIO_NUM;
  config.pin_d1 = Y3_GPIO_NUM;
  config.pin_d2 = Y4_GPIO_NUM;
  config.pin_d3 = Y5_GPIO_NUM;
  config.pin_d4 = Y6_GPIO_NUM;
  config.pin_d5 = Y7_GPIO_NUM;
  config.pin_d6 = Y8_GPIO_NUM;
  config.pin_d7 = Y9_GPIO_NUM;
  config.pin_xclk = XCLK_GPIO_NUM;
  config.pin_pclk = PCLK_GPIO_NUM;
  config.pin_vsync = VSYNC_GPIO_NUM;
  config.pin_href = HREF_GPIO_NUM;
  config.pin_sscb_sda = SIOD_GPIO_NUM;
  config.pin_sscb_scl = SIOC_GPIO_NUM;
  config.pin_pwdn = PWDN_GPIO_NUM;
  config.pin_reset = RESET_GPIO_NUM;
  config.xclk_freq_hz = 20000000;
  config.pixel_format = PIXFORMAT_JPEG;

  //init with high specs to pre-allocate larger buffers
  if (psramFound()) {
    config.frame_size = FRAMESIZE_UXGA;
    config.jpeg_quality = 10;  //0-63 lower number means higher quality
    config.fb_count = 2;
  } else {
    config.frame_size = FRAMESIZE_SVGA;
    config.jpeg_quality = 12;  //0-63 lower number means higher quality
    config.fb_count = 1;
  }

  // camera init
  esp_err_t err = esp_camera_init(&config);
  if (err != ESP_OK) {
    Serial.printf("Camera init failed with error 0x%x", err);
    delay(1000);
    ESP.restart();
  }

  // Drop down frame size for higher initial frame rate
  sensor_t * s = esp_camera_sensor_get();
  s->set_framesize(s, FRAMESIZE_CIF);  // UXGA|SXGA|XGA|SVGA|VGA|CIF|QVGA|HQVGA|QQVGA
}

String sendPhotoTelegram() {
  const char* myDomain = "api.telegram.org";
  String getAll = "";
  String getBody = "";

  camera_fb_t * fb = NULL;
  fb = esp_camera_fb_get();
  if(!fb) {
    Serial.println("Camera capture failed");
    delay(1000);
    ESP.restart();
    return "Camera capture failed";
  }

  Serial.println("Connect to " + String(myDomain));


  if (clientTCP.connect(myDomain, 443)) {
    Serial.println("Connection successful");

    String head = "--RandomNerdTutorials\r\nContent-Disposition: form-data; name=\"chat_id\"; \r\n\r\n" + CHAT_ID + "\r\n--RandomNerdTutorials\r\nContent-Disposition: form-data; name=\"photo\"; filename=\"esp32-cam.jpg\"\r\nContent-Type: image/jpeg\r\n\r\n";
    String tail = "\r\n--RandomNerdTutorials--\r\n";

    uint16_t imageLen = fb->len;
    uint16_t extraLen = head.length() + tail.length();
    uint16_t totalLen = imageLen + extraLen;

    clientTCP.println("POST /bot"+BOTtoken+"/sendPhoto HTTP/1.1");
    clientTCP.println("Host: " + String(myDomain));
    clientTCP.println("Content-Length: " + String(totalLen));
    clientTCP.println("Content-Type: multipart/form-data; boundary=RandomNerdTutorials");
    clientTCP.println();
    clientTCP.print(head);

    uint8_t *fbBuf = fb->buf;
    size_t fbLen = fb->len;
    for (size_t n=0;n<fbLen;n=n+1024) {
      if (n+1024<fbLen) {
        clientTCP.write(fbBuf, 1024);
        fbBuf += 1024;
      }
      else if (fbLen%1024>0) {
        size_t remainder = fbLen%1024;
        clientTCP.write(fbBuf, remainder);
      }
    }

    clientTCP.print(tail);

    esp_camera_fb_return(fb);

    int waitTime = 10000;   // timeout 10 seconds
    long startTimer = millis();
    boolean state = false;

    while ((startTimer + waitTime) > millis()){
      Serial.print(".");
      delay(100);
      while (clientTCP.available()) {
        char c = clientTCP.read();
        if (state==true) getBody += String(c);
        if (c == '\n') {
          if (getAll.length()==0) state=true;
          getAll = "";
        }
        else if (c != '\r')
          getAll += String(c);
        startTimer = millis();
      }
      if (getBody.length()>0) break;
    }
    clientTCP.stop();
    Serial.println(getBody);
  }
  else {
    getBody="Connected to api.telegram.org failed.";
    Serial.println("Connected to api.telegram.org failed.");
  }
  return getBody;
}

void setup() {
  WRITE_PERI_REG(RTC_CNTL_BROWN_OUT_REG, 0);
  // Init Serial Monitor
  Serial.begin(115200);

  //Set PIR
  pinMode(PIR_PIN, INPUT);

  // Config and init the camera
  configInitCamera();

  // Connect to Wi-Fi
  WiFi.mode(WIFI_STA);
  Serial.println();
  Serial.print("Connecting to ");
  Serial.println(ssid);
  WiFi.begin(ssid, password);
  clientTCP.setCACert(TELEGRAM_CERTIFICATE_ROOT); // Add root certificate for api.telegram.org
  while (WiFi.status() != WL_CONNECTED) {
    Serial.print(".");
    delay(500);
  }
}

void loop() {
  Serial.println(digitalRead(PIR_PIN));
  if (digitalRead(PIR_PIN)) {
    Serial.println("Preparing photo");
    sendPhotoTelegram();
    delay(20000);
  }
}
Now upload the above sketch to your ESP32-CAM. Make sure to close the bridge for the upload, then open it again and restart the board with the Reset button.
In the Serial Monitor, you should now see that the board connects to your WiFi and then waits for movement – you should see zeros racing through the Serial Monitor in quick succession until your PIR sensor has detected movement. Your trail camera will then send you a photo of the current situation to your Telegram bot.
Possible Errors
If you get an error message related to TELEGRAM_CERTIFICATE_ROOT, install the current version of the UniversalTelegramBot library in the Library manager.

