Course Content
The Arduino UNO
In the following three lessons, you will get to know your microcontroller - the Arduino UNO. You will learn more about its history, its functions, and most importantly: how to power it.
0/3
The Arduino IDE
For beginners, the Arduino IDE (Integrated Development Environment) is usually the first choice – and for good reason. You can program all Arduino boards with it and manage libraries for sensors, displays, etc. It also features the "Serial Monitor," where you can output data and troubleshoot.
0/2
Your first sketch
In the following lessons, you'll get to know the basic structure of an Arduino sketch and write your own programs. Let's get started!
0/2
The Serial Monitor
Now let's turn our attention to the Serial Monitor – a feature of the Arduino IDE that you will use in virtually every one of your projects.
0/2
Variables
No programmer can avoid variables. In the following lessons, you'll learn what types there are and what you can do with them.
0/3
Controlling an LED
Now it's time for more hardware! In the next lessons, you'll connect an LED to your Arduino. You'll first turn it on and off with a button. After that, you'll build a dimmer to control the brightness of the LED.
0/6
Lie Detector
Discover the entertaining side of electronics by building your own simple lie detector with your Arduino. This fun project uses basic components to measure skin resistance changes when someone might be telling a fib, perfect for adding some playful suspense to your next gathering with friends.
0/1
There’s music inside!
Your Arduino can do much more than "just" make LEDs shine at different brightness levels. For example, it can make music. In the following lesson, you'll learn how to use a piezo buzzer and coax some charming tones out of it.
0/3
A Theremin with Ultrasound
Do you want to make a bit more music? In this lesson, you'll build a theremin that you operate with your HC-SR04 ultrasonic sensor. You move your hand toward and away from the sensor - your Arduino calculates the pitch of the tones from the distance, which are then played through your piezo buzzer.
0/5
The Sound Sensor
Ready to explore how your Arduino can respond to sounds? In this lesson, we'll connect a sound sensor to your Arduino and learn how to make it respond to both digital noise detection and analog volume levels.
0/1
Build an Alarm System
In this project, you will build your own alarm system. It consists of three components: the sound sensor, which you have just learned about, the active piezo buzzer, and the RGB LED.
0/2
The DHT11 Temperature Sensor
Let's move on to another component that you'll certainly use in many projects: the temperature sensor. In this case, the popular DHT11, which can measure not only temperature but also humidity.
0/3
Arduino Course for Beginners

It’s time for the classic programming example – hello, world. In this lesson, you’ll write a small program that repeatedly outputs the line “hello, world” in your Serial Monitor.

Hello World Serial Monitor


Setting up the connection in the sketch

You already know how to open the Serial Monitor in the sketch window (using the magnifying glass in the top right). However, before any data can appear there, you need to start it in your sketch as well – this is a one-time setup, which is why the code for this goes in the setup function:

void setup() {
  Serial.begin(9600);
}


Here you extend the Serial function with the begin() command to establish the connection. Make sure to include the period between Serial and begin.

Between the round brackets, you provide the function with the baud rate – in our case 9600. As you learned in the previous lesson, this must match the setting in the Serial Monitor.

Displaying characters in the Serial Monitor

Now comes the interesting part. Enter the following code in the loop:

Serial.print("Hello, World!");
Serial.println();
delay(1000);


In the first line, you can see the .print() command. Between the brackets is the string “Hello, World!”. As you can see, this small greeting is enclosed in quotation marks – this is particularly important and a common source of errors.

If you remove the quotation marks for testing, you’ll receive an error message. This is because “Hello” would then be interpreted as a variable – and not as a string. We’ll cover the topic of variables in the next lesson.

The line below says Serial.println(); – this (“ln”) creates a new line in the Serial Monitor. If you didn’t do this, your Arduino would simply write the characters one after another.

However, you can also combine these two commands – the greeting and the new line – and save yourself a line of code:

Serial.println("Hello, World!");


Finally, in the loop you’ll find a delay of one second. Copy this complete sketch and upload it to your Arduino UNO (you can find it also for download in the Exercise Files tab):

void setup() {
Serial.begin(9600);
}

void loop() {
Serial.print("Hello, World!");
Serial.println();
delay(1000);
}


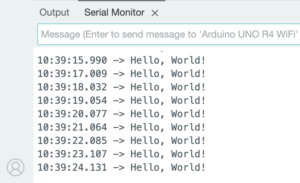
Does the greeting appear in your Serial Monitor?

In the next lesson, we’ll cover one of the most important topics: Variables 🙂

Exercise Files
Hello_world_Serial_Monitor.zip
Size: 307.00 B
We don't track you. Enjoy your cookies while making awesome projects!