Next, you’ll build a counter in the Serial Monitor that starts at one and counts up by one every second.
Let’s first look at how to declare a variable for integers. For this, you need the variable type int – which stands for integer. Let’s say the variable should be called number and initially have the value 1:
int number = 1;
That was easy. But you might be wondering where in the sketch this line should go – and this brings up another important aspect of variables: scope.
Global and local variables
Basically, there are two states that variables can have regarding their scope: global and local. Simply put, global means that the variable is available to all functions in the sketch and can be modified there. Local variables, on the other hand, can only be used in the function where they were declared – and can only be read and modified there.
You already know two of these functions from every sketch you create: void setup() and void loop(). If you were to create the variable in the setup function, it would only be available there as it would be local:
void setup() {
  int number = 1;
  Serial.begin(9600);
}

void loop() {
  Serial.println(number);
}
This specifically means that the loop cannot “see” the variable number – and therefore cannot output it to the Serial Monitor. This means we need a global variable. You declare this at the very beginning of the sketch, before the setup:
int number = 1;

void setup() {
  Serial.begin(9600);
}

void loop() {
  Serial.println(number);
}
This ensures that the loop can access it. Let’s return to the counter. For this, we first want to output the variable number to the Serial Monitor. Then the number in the variable should be increased by one. This works quite simply:
number = number + 1;
Does this notation confuse you? Then try reading the line of code like this: “Take the variable number, assign it its previous value and add the number 1 to it.”
There is another, shorter notation – from which the language C++ actually gets its name:
number++;
This notation might be less intuitive at first glance, but it saves you some time when programming – and looks more professional. 😉
By the way, if you want to use other types of calculations instead of addition, this works as follows:
number = number - 1; //Subtraction
number--; //Also subtraction
number = number * 2; //Multiplication
number = number / 2; //Division
And that’s all you need for the counter. The complete sketch then looks like this:
int number = 1;

void setup() {
  Serial.begin(9600);
}

void loop() {
  Serial.println(number);
  number++;
  delay(1000);
}
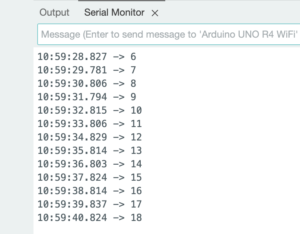
Here again you make use of the loop: It outputs the variable number, adds one, waits a second – and starts this procedure again from the beginning. This continues until you restart or turn off the Arduino.
In the next lessons, we’ll turn to the hardware – starting with an LED.
