Now it’s getting serious. You’ve already installed the ultrasonic sensor on your breadboard and measured distances with it. You’ll use the sensor to determine the pitch by moving your hand in front of it. All that’s missing is a speaker – in our case, the passive piezo buzzer that you’ve already become familiar with.
Build the theremin on your breadboard as follows – or add the piezo if you still have the ultrasonic sensor installed.
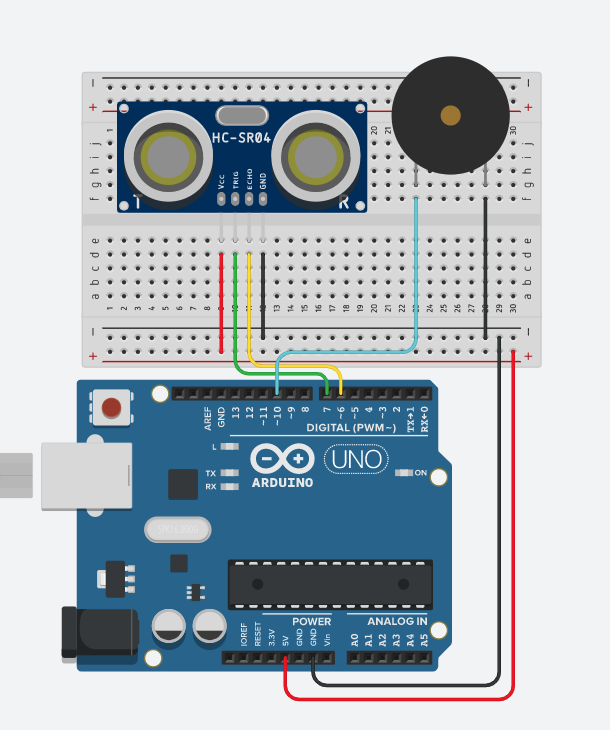
Once you’re finished, you can continue with the sketch right away.
The required constants and variables
For your theremin, you need a whole range of constants and variables. First, the three constants for the pins to which your ultrasonic sensor and the piezo are connected.
const int trigger = 7;
const int echo = 6;
const int piezo = 10;
___STEADY_PAYWALL___
Then you need two variables for the distances that your HC-SR04 measures. In the first variable distance, you continuously store the current measurement result. You need the second variable distanceHigh to store the maximum distance of your hand from the sensor at the beginning of the sketch – more on that in a moment.
int distance = 0;
int distanceHigh = 0;
The only thing missing is a variable for the note that your piezo plays. As with the music box with the potentiometer, the frequency values (pitches) differ from the values that your ultrasonic sensor measures. That’s why the map() function will come into play again later. But first, you set the variable to zero:
int note = 0;
The Setup Function
Here you first define the pinMode of the Echo and Trig pins of your sensor again:
pinMode(trigger, OUTPUT);
pinMode(echo, INPUT);
This is followed by a While-Loop with the purpose of calibrating your sensor. You measure the maximum distance of your hand from the sensor in the first three seconds after the program starts.
For this, you use the millis() function, which returns the number of milliseconds that have elapsed since the program started. As long as (while) 3000 milliseconds – i.e., three seconds – have not yet passed, your sensor repeatedly measures the distance and stores it in the distance variable:
while (millis() < 3000) {
  digitalWrite(trigger, HIGH);
  digitalWrite(trigger, LOW);
  distance = pulseIn(echo, HIGH);
But that’s not enough – you also want to save the maximum distance in the distanceHigh variable to limit your “playing field”. You do this with a conditional query after each measurement.
Whenever the current distance distance exceeds the maximum distance distanceHigh, it is updated to the value of distance.
if (distance > distanceHigh) {
  distanceHigh = distance;
}
As mentioned, the While-Loop is only executed in the first three seconds after the program starts. As soon as this time has elapsed, it continues immediately – with the music. 🙂
The Music plays in the Loop
The loop also begins each time by measuring the distance of your hand. Then you store this distance in the distance variable.
digitalWrite(trigger, HIGH);
delay(10);
digitalWrite(trigger, LOW);

distance = pulseIn(echo, HIGH);
Of course, this distance can still exceed the maximum distance you calibrated – which it shouldn’t. Therefore, you next check whether distance is above distanceHigh. If this is the case, you limit the measured value to the maximum distance:
if (distance > distanceHigh) {
  distance = distanceHigh;
}
All that’s missing now are the tones. For this, you need the map() function again. Here you take the distance distance, whose range you limit to 50 to distanceHigh. You set the frequency range of your tones to 50 to 3000 Hz. You then assign the value “mapped” in the function to the note variable.
note = map(distance, 50, distanceHigh, 50, 3000);
tone(piezo, note);

delay(10);
Then you play the found note with tone() and end the loop with a very short delay.
And that’s it! Load the sketch onto your Arduino, calibrate your sensor, and start your career on the theremin! 🙂
