Do you have a green thumb? Even if you do, this project will help remind you to water your plants. Simply place the Plant Monitor in the pot with your favorite plant and calibrate it to the appropriate soil moisture level. When the soil gets too dry, the LED will start blinking, giving you a timely reminder to grab the watering can.
Materials Required
- ATtiny85
- Moisture sensor
- 3.3V button cell battery (CR2032)
- Battery holder with soldered wires
- LED
- 100Ω resistor
- Wires
- Mini breadboard

Overview
What the Plant Monitor Does
A good Plant Monitor should blend in unobtrusively in a pot and operate independently of external power. The ATtiny85 is perfect for this purpose because it can run on a 3.3V button cell battery for an extended period — provided it doesn’t measure continuously but spends most of its time in sleep mode.
With the code in this project, the Plant Monitor checks the soil moisture level every 30 minutes. The rest of the time, it sleeps and draws minimal power from the battery, allowing it to last several months without replacement.
To make the monitor compact, use both the front and back of the mini breadboard. Components can be attached to the back and connected with wires to the ATtiny85 on the front. The completed monitor will fit into a box about 40 x 70 x 40 mm.


Step-by-Step Guide
1. Preparing the Components
Assembling the ATtiny85
Before assembly, upload the provided sketch to your ATtiny85. You’ll find the code at the end of this tutorial. Learn how to upload code to the ATtiny85 using an Arduino Uno here.
2. Assembly Process
This project takes about 30 minutes to build, even for beginners.
Preparing the Back
The breadboard’s back has an adhesive surface. Start by peeling off the protective film. Next, attach the battery holder, and the moisture sensor’s board and probe as shown. Press lightly at first to ensure correct positioning; once satisfied, press firmly to secure them.

Adding Wires to the Back
While still working on the back, connect the probe to the sensor board. Use two jumper wires with sockets at both ends to make the connection:

After securing the connectors, wrap the cables over the breadboard’s top to minimize clutter.
Next, connect the moisture sensor board pins:
- VCC (Power)
- GND (Ground)
- DO (Digital Output)
Connect jumper wires to these pins for later attachment to the ATtiny85.

3. Front Side Setup
Placing the ATtiny85
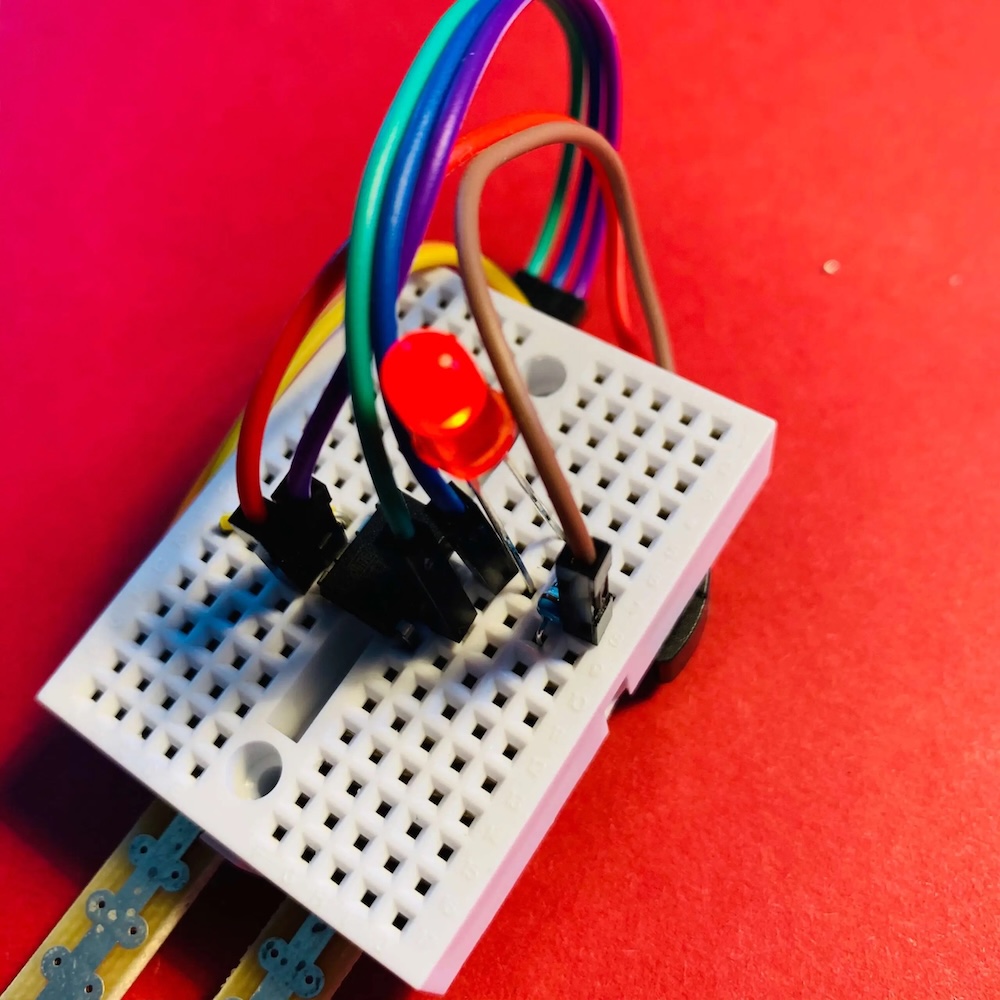
Examine the ATtiny85 chip. One corner has a small round indentation that marks Pin 1. Orient the breadboard so the moisture sensor’s probe points down. Insert the ATtiny85 carefully into the center of the breadboard with Pin 1 at the bottom-right. Be gentle to avoid bending the pins.
Use a socket for the ATtiny85 to prevent damage when removing or reattaching it.

Here’s the translation of the text from your image:
Connecting the moisture sensor to the ATtiny85
Before connecting the moisture sensor wires to the breadboard, take a look at the pin numbering of the ATtiny85:

As shown, the small indentation marks Pin 1 of the ATtiny85. The numbers of the other pins can be determined by counting counterclockwise from this point.
Position the breadboard so that the probe of the moisture sensor faces upwards. This orientation ensures that the ATtiny85 matches the arrangement shown above.
Now connect the wire from Pin DO of the sensor to Pin 2 of the ATtiny85. Connect GND to Pin 4 — that is the negative pole. Finally, connect the sensor’s VCC pin next to Pin 7 of the ATtiny85. For reference, here’s the connection overview:
| Sensor Pins | ATtiny85 Pins |
|---|---|
| DO | Pin 2 |
| GND | Pin 4 |
| VCC | Pin 7 |
Adding the LED and Resistor
Shorten and bend the resistor’s leads as shown below. Place the LED’s short leg (cathode) beside Pin 4 (ground) and the long leg (anode) two holes away. Connect the resistor between the anode and Pin 3 of the ATtiny85.

Adding Power
Connect the red wire of the battery holder to Pin 8 and the black wire to Pin 4.

The final wire
You’ll need one last small jumper wire. This wire is essential for calibrating the Plant Monitor so it triggers an alert when the surrounding soil becomes too dry.
Now insert this jumper wire between Pin 8 and Pin 6 of the ATtiny85:

That’s it! Your Plant Monitor is assembled and ready for calibration.
Calibrating Your Plant Monitor
After uploading the code below but before starting to use the plant monitor, use a screwdriver to turn the potentiometer on the back of the moisture sensor in both directions. If everything is connected correctly, the LED should turn on and off depending on how far you turn the potentiometer in each direction.
___STEADY_PAYWALL___
If the LED responds as expected, you’re ready to move on:
Place the Plant Monitor with the probe into the soil next to a plant. Ideally, the soil should be just dry enough that you would normally water the plant at this point. Adjust the potentiometer on the back of the sensor so that the LED is just barely lit. That’s it — calibration is complete, and the monitor now knows when to alert you.
Next, remove the jumper wire from between Pin 6 and Pin 8 on the breadboard and set it aside. If everything is working correctly, the LED should now blink several times every few seconds — this is the signal that it’s time to water your plant.
At this point, you can optionally take out the Plant Monitor, place it in its enclosure, and then put it back into the soil next to the plant.
Finally, water the plant — the LED should stop blinking until the soil becomes too dry again, signaling it’s time for another watering.
The Code of the Plant Monitor
The code for the Plant Monitor is divided into the following parts:
- Calibrating the sensor
- Measuring soil moisture
- Triggering an LED alert
- Putting the ATtiny85 to sleep to conserve battery
Required Libraries
The code requires two libraries, which are already pre-installed:
#include <avr/sleep.h>
#include <avr/wdt.h>avr/sleep.h: This library allows you to put the ATtiny85 into sleep mode, significantly reducing its power consumption. Learn moreavr/wdt.h: This library provides the Watchdog Timer functionality, which is used to wake up the ATtiny85 after a specified time interval.
Pin Definitions
Four pins are defined for use in this project:
#define calibrationPin 1
#define sensorPin 2
#define sensorValuePin 3
#define ledPin 4
These pins are logically mapped and do not correspond directly to the physical pins on the ATtiny85. Refer to the ATtiny85 Pinout diagram for guidance.
For example, physical Pin 1 is referenced in code as PB5 but is defined as “5” in most sketches.
Setup Configuration
Define whether the pins function as inputs or outputs in the setup() function:
void setup() {
  pinMode(calibrationPin, INPUT);
  pinMode(sensorPin, OUTPUT);
  pinMode(sensorValuePin, INPUT);
  pinMode(ledPin, OUTPUT);
}
Calibrating the Sensor
In the loop() function, check if the calibration jumper is connected. If so, the code runs only the calibration routine:
if (digitalRead(calibrationPin) == HIGH) {
  digitalWrite(sensorPin, HIGH);
  if (digitalRead(sensorValuePin) == 1) {
    digitalWrite(ledPin, HIGH);
  } else {
    digitalWrite(ledPin, LOW);
  }
}
- The sensor is powered up.
- If soil moisture is low, the LED lights up.
- If soil moisture is sufficient, the LED turns off.
Adjust the potentiometer on the sensor board to fine-tune this threshold.
Measuring Soil Moisture
For regular operation:
- Turn the sensor on for 100 milliseconds to measure moisture:
digitalWrite(sensorPin, HIGH);
delay(100);- If the sensor detects dry soil:
- Turn off the sensor to save power.
- Blink the LED 10 times.
- Enter a low-power sleep mode for 8 seconds:
if (digitalRead(sensorValuePin) == 1) {
  digitalWrite(sensorPin, LOW);
  for (byte i = 0; i < 10; i++) {
    digitalWrite(ledPin, HIGH);
    delay(200);
    digitalWrite(ledPin, LOW);
    delay(200);
  }
  myWatchdogEnable(0b100001);
}- If soil is sufficiently moist, the ATtiny85 enters sleep mode for 30 minutes:
else {
  digitalWrite(ledPin, LOW);
  digitalWrite(sensorPin, LOW);
  for (byte j = 0; j <= 225; j++) {
    myWatchdogEnable(0b100001);
  }
}
In this project, the myWatchdogEnable() function is utilized, which can be found in the sketch provided. This function is essential for implementing sleep mode and increasing the battery life of your plant monitor.
The function is passed the byte 0b100001, configuring the watchdog timer to an 8-second interval. This interval aligns with the low-power mode requirement. For prolonged sleep periods, the For-loop ensures that this 8-second timer is executed 225 times, effectively adding up to 30 minutes of sleep duration.This conserves power by putting the ATtiny85 into a low-power state and waking it up periodically based on the timer.
Complete Code
#include <avr/sleep.h>
#include <avr/wdt.h>

#define calibrationPin 1
#define sensorPin 2
#define sensorValuePin 3
#define ledPin 4

void setup() {
  pinMode(calibrationPin, INPUT);
  pinMode(sensorPin, OUTPUT);
  pinMode(sensorValuePin, INPUT);
  pinMode(ledPin, OUTPUT);
}

void loop() {
  if (digitalRead(calibrationPin) == HIGH) {
    digitalWrite(sensorPin, HIGH);
    if (digitalRead(sensorValuePin) == 1) {
      digitalWrite(ledPin, HIGH);
    } else {
      digitalWrite(ledPin, LOW);
    }
  } else {
    digitalWrite(sensorPin, HIGH);
    delay(100);
    if (digitalRead(sensorValuePin) == 1) {
      digitalWrite(sensorPin, LOW);
      for (byte i = 0; i < 10; i++) {
        digitalWrite(ledPin, HIGH);
        delay(200);
        digitalWrite(ledPin, LOW);
        delay(200);
      }
      myWatchdogEnable(0b100001);
    } else {
      digitalWrite(ledPin, LOW);
      digitalWrite(sensorPin, LOW);
      for (byte j = 0; j <= 225; j++) {
        myWatchdogEnable(0b100001);
      }
    }
  }
}

void myWatchdogEnable(const byte interval) {
  MCUSR = 0;
  WDTCR |= 0b00011000;
  WDTCR = 0b01000000 | interval;
  wdt_reset();
  set_sleep_mode(SLEEP_MODE_PWR_DOWN);
  sleep_mode();
}
Enjoy building your compact plant monitor!
