In this project, you’ll build your very own ESP32 web server. You’ll progress step-by-step: from a simple “Hello World” to controlling an LED, and finally to displaying the current temperature. Your microcontroller will make all this available on a webpage that you can access from any device on your network. Let’s get started!
Why a Web Server on the ESP32?
The ESP32 is a real powerhouse. With its integrated Wi-Fi module, it’s perfectly suited for “Internet of Things” (IoT) projects. A small web server running on your ESP32 allows you to access and control the microcontroller from any device in your Wi-Fi network—be it your smartphone, tablet, or laptop. You can check states, trigger actions, and visualize data, all through a simple web browser.
Part 1: “Hello World!” – Your First ESP32 Web Server
As with any good programming tutorial, we’ll start with the absolute basics. Our first goal: to create a webpage that displays a friendly “Hello World from your ESP32!” in our browser.
What you’ll need:
- An ESP32 development board (e.g., ESP32 DevKitC oder Arduino ESP32)
- A compatible USB cable
- The Arduino IDE, already set up for the ESP32 (read the first part).
The Sketch
Since you don’t need any hardware other than the microcontroller for this first test, you can jump right into the code. Copy the following sketch, enter your Wi-Fi credentials at the top, and upload it to your ESP32:
// ESP32 Web Server
// en.polluxlabs.net

#include <WiFi.h>

// Your Wi-Fi credentials
const char* ssid = "YOUR_WIFI_NAME";
const char* password = "YOUR_WIFI_PASSWORD";

// Create a server object on port 80 (standard for HTTP)
WiFiServer server(80);

void setup() {
  Serial.begin(115200);
  delay(10);

  // Connect to Wi-Fi
  Serial.println();
  Serial.print("Connecting to ");
  Serial.println(ssid);

  WiFi.begin(ssid, password);

  while (WiFi.status() != WL_CONNECTED) {
    delay(500);
    Serial.print(".");
  }

  Serial.println("");
  Serial.println("WiFi connected.");
  Serial.println("IP Address: ");
  Serial.println(WiFi.localIP());

  server.begin();
}

void loop() {
  WiFiClient client = server.available();   // Listen for incoming clients

  if (client) {                             // If a new client connects...
    Serial.println("New client connected.");
    String currentLine = "";                // String to hold incoming data from the client
    while (client.connected()) {            // loop while the client's connected
      if (client.available()) {             // if there's bytes to read from the client...
        char c = client.read();             // ...read a byte
        Serial.write(c);
        if (c == '\n') {                    // if the byte is a newline character...
          // if the current line is blank, you got two newline characters in a row.
          // that's the end of the client HTTP request, so send a response:
          if (currentLine.length() == 0) {
            // HTTP headers start with a response code (e.g. HTTP/1.1 200 OK)
            // and a content-type so the client knows what's coming, then a blank line:
            client.println("HTTP/1.1 200 OK");
            client.println("Content-type:text/html");
            client.println();

            // The actual webpage
            client.print("<h1>Hello World from your ESP32!</h1>");

            // The HTTP response ends with another blank line
            client.println();
            break;
          } else {
            currentLine = "";
          }
        } else if (c != '\r') {
          currentLine += c;
        }
      }
    }
    // Close the connection
    client.stop();
    Serial.println("Client disconnected.");
  }
}
What’s happening here?
setup(): The ESP32 connects to the Wi-Fi network you specified. As soon as the connection is established, it prints its IP address to the Serial Monitor. We’ll need this address in a moment! Then, the web server is started.loop(): The loop waits for incoming connections. As soon as you open the IP address in a browser, the browser becomes a “client.” The ESP32 recognizes this, sends back a simple HTML code (<h1>Hello World...</h1>), and then closes the connection.
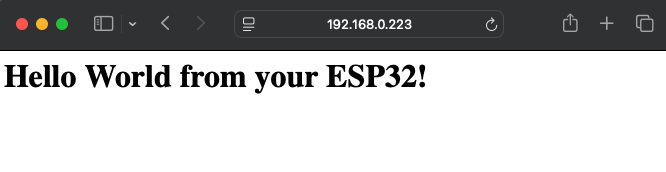
Copy the IP address of your web server and open it in a browser of your choice. You should now see the following (very simple) webpage.
Part 2: Light On! – Controlling an LED via the Web Server
Now that the basics are covered, let’s control something tangible. An LED is the perfect example for this. We’ll expand our code so that two simple buttons appear on our webpage, allowing us to turn an LED on and off.
What you’ll need additionally:
- An LED
- A 220-Ohm resistor
- A breadboard and a few jumper cables
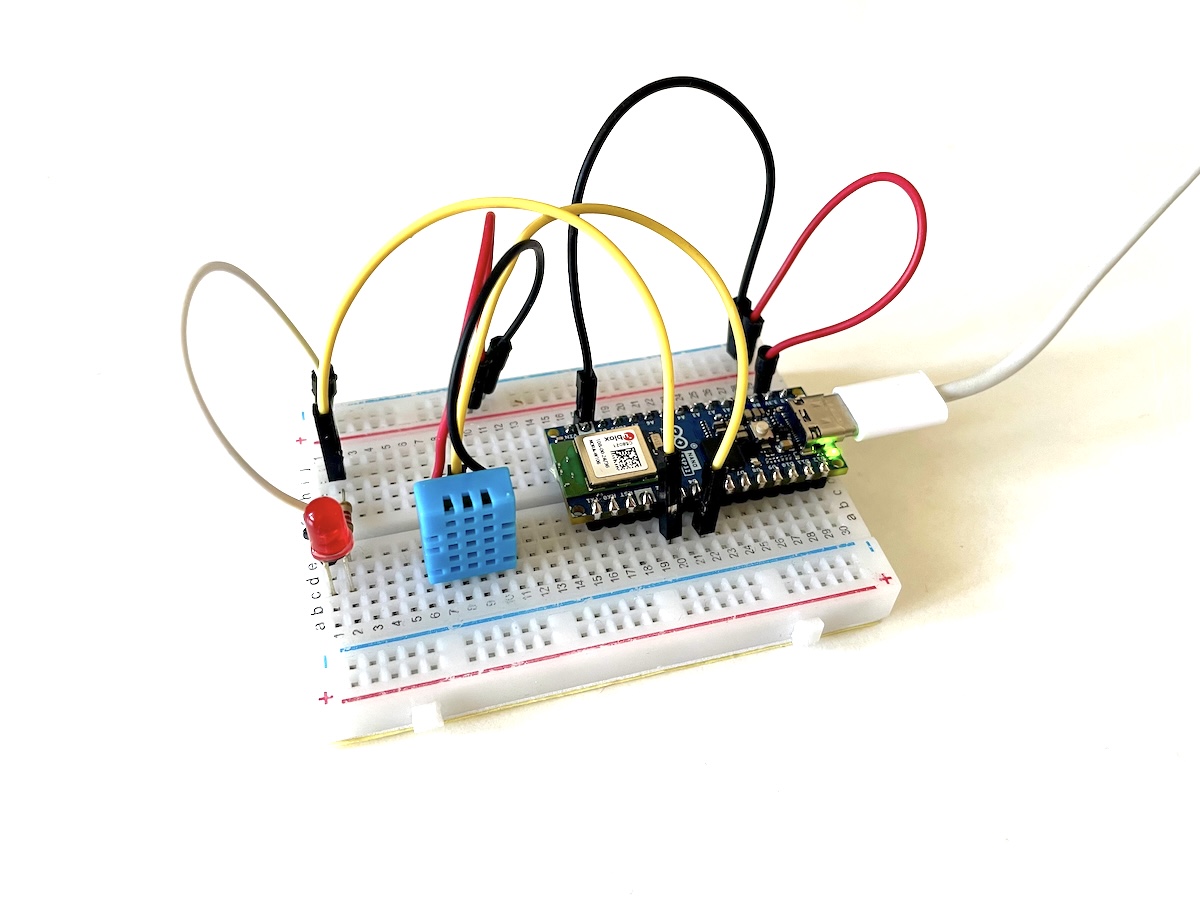
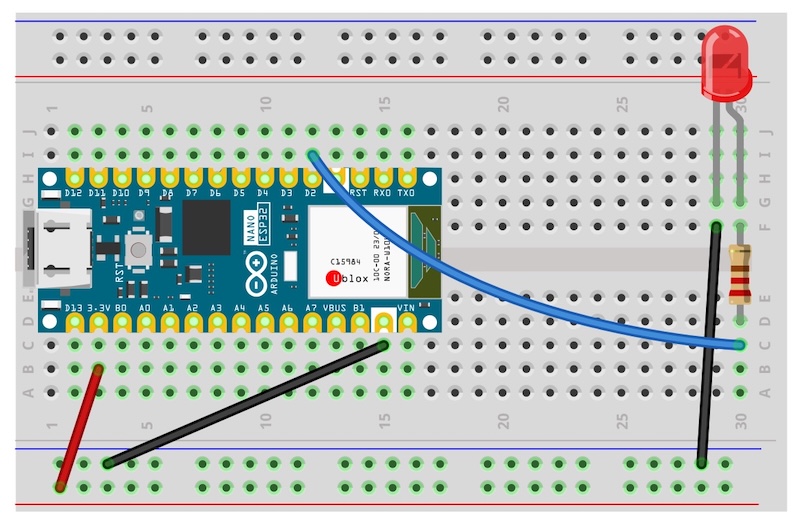
The Breadboard Setup
Connect the anode (the long leg) of the LED through the resistor to a GPIO pin of the ESP32 (e.g., GPIO 2 oder D2 on the Arduino ESP32 as shown below). Connect the cathode (the short leg) to GND.
The Sketch
You’ll build upon your first sketch. The biggest changes are in the loop() function, where we need to parse the browser’s request.
___STEADY_PAYWALL___
// ESP32 Web Server with LED
// en.polluxlabs.net

#include <WiFi.h>

// Your Wi-Fi credentials
const char* ssid = "YOUR_WIFI_NAME";
const char* password = "YOUR_WIFI_PASSWORD";

WiFiServer server(80);

// Define the pin for the LED
const int ledPin = 2; // e.g., GPIO 2
String ledStatus = "off";

void setup() {
  Serial.begin(115200);
  pinMode(ledPin, OUTPUT);
  digitalWrite(ledPin, LOW);

  // ... (Wi-Fi connection code from Part 1)
  // Connect to Wi-Fi
  Serial.println();
  Serial.print("Connecting to ");
  Serial.println(ssid);

  WiFi.begin(ssid, password);

  while (WiFi.status() != WL_CONNECTED) {
    delay(500);
    Serial.print(".");
  }

  Serial.println("");
  Serial.println("WiFi connected.");
  Serial.println("IP Address: ");
  Serial.println(WiFi.localIP());

  server.begin();
}

void loop() {
  WiFiClient client = server.available();

  if (client) {
    Serial.println("New client connected.");
    String header = ""; // Stores the request header
    while (client.connected()) {
      if (client.available()) {
        char c = client.read();
        header += c;
        if (c == '\n') {
          // Check the request URL
          if (header.indexOf("GET /led/on") >= 0) {
            digitalWrite(ledPin, HIGH);
            ledStatus = "on";
          } else if (header.indexOf("GET /led/off") >= 0) {
            digitalWrite(ledPin, LOW);
            ledStatus = "off";
          }

          if (header.endsWith("\r\n\r\n")) {
            // Send HTTP headers
            client.println("HTTP/1.1 200 OK");
            client.println("Content-type:text/html");
            client.println();

            // The webpage with buttons
            client.print("<!DOCTYPE html><html><head><title>ESP32 LED Control</title></head><body>");
            client.print("<h1>LED Control</h1>");
            client.print("<p>The state of the LED is: <strong>" + ledStatus + "</strong></p>");
            client.print("<a href=\"/led/on\"><button>LED ON</button></a>");
            client.print("<a href=\"/led/off\"><button>LED OFF</button></a>");
            client.print("</body></html>");

            client.println();
            break;
          }
        }
      }
    }
    client.stop();
    Serial.println("Client disconnected.");
  }
}
What’s new?
- We read the entire “header” of the request from the browser.
- We search the header for specific URLs that we define ourselves:
/led/onand/led/off. - Depending on which URL is called (by clicking the corresponding button), we turn the LED on or off using
digitalWrite(). - The webpage itself now contains clickable links (
<a>tags) that call exactly these URLs.
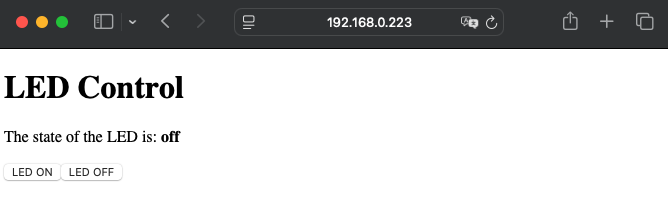
Upload the new code and open the IP address. You can now control the LED via the webpage.
Part 3: Temperature Display with a DHT11
Now things get really exciting! We’ll read data from a sensor and display it live on our webpage. For this, we’ll use the popular and inexpensive DHT11 temperature and humidity sensor. On Pollux Labs, you can also find tutorials for other temperature sensors like the DHT22.
What you’ll need additionally:
- A DHT11 sensor
- The Adafruit DHT Sensor Library and the Adafruit Unified Sensor Library. You can find both in the Arduino IDE’s Library Manager.
The Breadboard Setup
The DHT11 usually has four pins, but only three are used: VCC (or +), DATA, and GND. Use the following diagram for your setup. You can leave the LED on the breadboard; in the next part, we’ll combine the LED control and temperature measurement for your ESP32 web server.
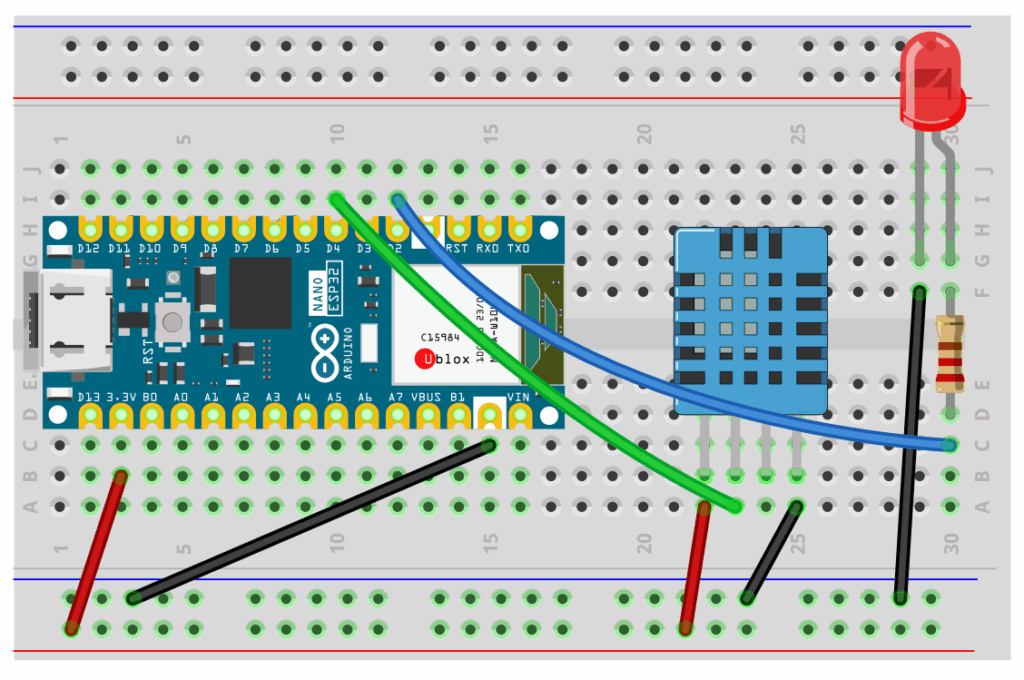
Connect VCC to the 3.3V pin of the ESP32. Connect GND to a ground pin. Connect the DATA pin to a digital pin, for example, D4 on the Arduino ESP32.
The Sketch
Here is the sketch that allows your ESP32 to measure the temperature and display it on the webpage.
// ESP32 Web Server with Temperature Measurement
// en.polluxlabs.net
#include <WiFi.h>
#include <Adafruit_Sensor.h>
#include <DHT.h>
// Your Wi-Fi credentials
const char* ssid = "YOUR_WIFI_NAME";
const char* password = "YOUR_WIFI_PASSWORD";
WiFiServer server(80);
// DHT Sensor Configuration
#define DHTPIN 4 // Pin the DHT11 is connected to
#define DHTTYPE DHT11 // Sensor type
DHT dht(DHTPIN, DHTTYPE);
void setup() {
Serial.begin(115200);
// ... (Wi-Fi connection code from Part 1)
// Connect to Wi-Fi
Serial.println();
Serial.print("Connecting to ");
Serial.println(ssid);
WiFi.begin(ssid, password);
while (WiFi.status() != WL_CONNECTED) {
delay(500);
Serial.print(".");
}
Serial.println("");
Serial.println("WiFi connected.");
Serial.println("IP Address: ");
Serial.println(WiFi.localIP());
dht.begin();
server.begin();
}
void loop() {
WiFiClient client = server.available();
if (client) {
Serial.println("New client connected.");
String header = "";
while (client.connected()) {
if (client.available()) {
char c = client.read();
header += c;
if (c == '\n' && header.endsWith("\r\n\r\n")) {
// Read temperature
float temperature = dht.readTemperature();
// Check if the reading was successful
if (isnan(temperature)) {
Serial.println("Failed to read from DHT sensor!");
temperature = 0; // Default value on error
}
// Send HTTP headers
client.println("HTTP/1.1 200 OK");
client.println("Content-type:text/html; charset=UTF-8"); // Important for characters like °
client.println();
// The webpage with temperature display
client.print("<!DOCTYPE html><html><head><title>ESP32 Weather Station</title>");
client.print("<meta http-equiv='refresh' content='10'>"); // Reload page every 10s
client.print("</head><body>");
client.print("<h1>ESP32 Mini Weather Station</h1>");
client.print("<p>Current Temperature: <strong>" + String(temperature) + " °C</strong></p>");
client.print("</body></html>");
client.println();
break;
}
}
}
client.stop();
Serial.println("Client disconnected.");
}
}
What’s new?
- We include the
DHT.hlibrary and initialize the sensor. - In the
loop(), we read the temperature withdht.readTemperature()for each request. - We’ve added a small
<meta>tag to our HTML that instructs the browser to automatically reload the page every 10 seconds. This way, you always see the latest values! - The temperature is then sent to the browser as part of the webpage.
Part 4: Combining LED Control and Temperature
We’ve learned how to switch an LED and how to display sensor data. Now, let’s bring it all together! Our goal is a single webpage where we can see the current room temperature and simultaneously turn an LED on and off. It’s like a small, neat smart-home hub.
You don’t need to change anything on the breadboard for this – you’ll only be modifying the sketch:
// ESP32 Web Server with LED Control and Temperature Measurement
// en.polluxlabs.net
#include <WiFi.h>
#include <Adafruit_Sensor.h>
#include <DHT.h>
// Your Wi-Fi credentials
const char* ssid = "YOUR_WIFI_NAME";
const char* password = "YOUR_WIFI_PASSWORD";
WiFiServer server(80);
// --- Configuration for the LED ---
const int ledPin = 2;
String ledStatus = "off";
// --- Configuration for the DHT Sensor ---
#define DHTPIN 4 // Pin the DHT11 is connected to
#define DHTTYPE DHT11 // Sensor type
DHT dht(DHTPIN, DHTTYPE);
void setup() {
Serial.begin(115200);
// --- Initialization for the LED ---
pinMode(ledPin, OUTPUT);
digitalWrite(ledPin, LOW);
// --- Initialization for the DHT Sensor ---
dht.begin();
// Connect to Wi-Fi (code from previous parts)
Serial.println();
Serial.print("Connecting to ");
Serial.println(ssid);
WiFi.begin(ssid, password);
while (WiFi.status() != WL_CONNECTED) {
delay(500);
Serial.print(".");
}
Serial.println("");
Serial.println("WiFi connected.");
Serial.println("IP Address: ");
Serial.println(WiFi.localIP());
server.begin();
}
void loop() {
WiFiClient client = server.available();
if (client) {
Serial.println("New client connected.");
String header = "";
while (client.connected()) {
if (client.available()) {
char c = client.read();
header += c;
// When the browser request is completely received
if (c == '\n' && header.endsWith("\r\n\r\n")) {
// --- Parse URL for LED control ---
if (header.indexOf("GET /led/on") >= 0) {
digitalWrite(ledPin, HIGH);
ledStatus = "on";
} else if (header.indexOf("GET /led/off") >= 0) {
digitalWrite(ledPin, LOW);
ledStatus = "off";
}
// --- Read temperature from DHT sensor ---
float temperature = dht.readTemperature();
if (isnan(temperature)) {
Serial.println("Failed to read from DHT sensor!");
temperature = 0; // Default value on error
}
// --- Send HTTP response & combined webpage ---
client.println("HTTP/1.1 200 OK");
client.println("Content-type:text/html; charset=UTF-8");
// Important note: The following line causes an auto-refresh.
// This is great for the temperature but also resets the displayed LED status
// to the actual state every 10 seconds.
client.println("Refresh: 10");
client.println(); // Blank line after headers
// The actual webpage
client.print("<!DOCTYPE html><html><head><title>ESP32 Combo Control</title>");
client.print("<style> body { font-family: sans-serif; } button { padding: 10px; font-size: 16px; } </style>");
client.print("</head><body>");
client.print("<h1>ESP32 Combo Control</h1>");
// Section for the sensor
client.print("<h2>Mini Weather Station</h2>");
client.print("<p>Current Temperature: <strong>" + String(temperature) + " °C</strong></p>");
// Section for the LED
client.print("<h2>LED Control</h2>");
client.print("<p>The state of the LED is: <strong>" + ledStatus + "</strong></p>");
client.print("<a href=\"/led/on\"><button>LED ON</button></a>");
client.print("<a href=\"/led/off\"><button>LED OFF</button></a>");
client.print("</body></html>");
client.println();
break; // Exit the loop since the response has been sent
}
}
}
client.stop();
Serial.println("Client disconnected.");
}
}
What’s new?
- Merged Variables: We’ve added the declarations for
ledPinandledStatusto the top with the DHT sensor configuration. - Expanded
setup(): Thesetup()function now initializes not only the sensor but also the LED pin. - The
loop(): This is the most important part. Before the webpage is constructed, both actions now occur:- First, as in Part 2, it checks if the called URL contains
/led/onor/led/offand switches the LED accordingly. - Then, as in Part 3, the temperature is read from the sensor.
- First, as in Part 2, it checks if the called URL contains
- Combined HTML: The HTML code sent to the browser now simply contains both sections—the temperature display and the buttons for the LED. A few simple
<h2>headings have been added for structure, along with a tiny bit of CSS for the buttons.
If you upload this code now and open the IP address in your browser, you’ll see a webpage that shows you the temperature and allows you to turn the light on and off at the same time.
Part 5: The Finishing Touch – A Modern and Responsive Interface
Your ESP32 web server is functional, but the webpage could look a bit more modern. This is where some CSS (Cascading Style Sheets) comes into play. The circuit remains exactly the same as in Part 4.
The Final Code with a Sleek Interface: Upload this code to your ESP32. The design of the webpage is handled in the long client.print() lines that contain the HTML and CSS code.
// ESP32 Web Server with LED Control, Temperature Measurement, and Modern UI
// en.polluxlabs.net
#include <WiFi.h>
#include <Adafruit_Sensor.h>
#include <DHT.h>
// Your Wi-Fi credentials
const char* ssid = "YOUR_WIFI_NAME";
const char* password = "YOUR_WIFI_PASSWORD";
WiFiServer server(80);
// --- Configuration for the LED ---
const int ledPin = 2;
// --- Configuration for the DHT Sensor ---
#define DHTPIN 4 // Pin the DHT11 is connected to
#define DHTTYPE DHT11 // Sensor type
DHT dht(DHTPIN, DHTTYPE);
void setup() {
Serial.begin(115200);
pinMode(ledPin, OUTPUT);
digitalWrite(ledPin, LOW);
dht.begin();
// Connect to Wi-Fi
Serial.println();
Serial.print("Connecting to ");
Serial.println(ssid);
WiFi.begin(ssid, password);
while (WiFi.status() != WL_CONNECTED) {
delay(500);
Serial.print(".");
}
Serial.println("");
Serial.println("WiFi connected.");
Serial.println("IP Address: ");
Serial.println(WiFi.localIP());
server.begin();
}
void loop() {
WiFiClient client = server.available();
if (client) {
String header = "";
while (client.connected()) {
if (client.available()) {
char c = client.read();
header += c;
if (c == '\n' && header.endsWith("\r\n\r\n")) {
// --- Parse URL for LED control ---
if (header.indexOf("GET /led/on") >= 0) {
digitalWrite(ledPin, HIGH);
} else if (header.indexOf("GET /led/off") >= 0) {
digitalWrite(ledPin, LOW);
}
// --- Read current status of LED and sensor ---
String ledStatus = digitalRead(ledPin) ? "on" : "off";
float temperature = dht.readTemperature();
if (isnan(temperature)) {
Serial.println("Failed to read from DHT sensor!");
temperature = 0.0;
}
// --- Send HTTP response & modern webpage ---
client.println("HTTP/1.1 200 OK");
client.println("Content-type:text/html; charset=UTF-8");
client.println();
client.print("<!DOCTYPE html>");
client.print("<html lang='en'>");
client.print("<head>");
client.print("<meta charset='UTF-8'>");
// This line is CRUCIAL for proper display on smartphones!
client.print("<meta name='viewport' content='width=device-width, initial-scale=1.0'>");
client.print("<title>Pollux Labs - ESP32 Control</title>");
client.print("<meta http-equiv='refresh' content='10'>");
// --- CSS STYLING STARTS HERE ---
client.print("<style>");
client.print("body{background-color:#1e1e1e;color:#e0e0e0;font-family:system-ui,sans-serif;text-align:center;margin:0;padding:20px;}");
client.print(".container{max-width:800px;margin:auto;display:flex;flex-wrap:wrap;justify-content:center;gap:20px;}");
client.print(".card{background-color:#2a2a2a;border-radius:15px;padding:20px;box-shadow:0 4px 8px rgba(0,0,0,0.2);flex-basis:300px;flex-grow:1;}");
client.print("h1{color:#00aaff;}");
client.print("h2{border-bottom:2px solid #00aaff;padding-bottom:10px;margin-top:0;}");
client.print(".sensor-value{font-size:3.5rem;font-weight:bold;color:#fff;}");
client.print(".unit{font-size:1.5rem;color:#00aaff;}");
client.print(".led-status{font-size:1.2rem;margin-bottom:20px;}");
client.print(".buttons{display:flex;gap:15px;justify-content:center;}");
client.print("a.button{text-decoration:none;color:#fff;padding:15px 30px;border-radius:10px;font-weight:bold;transition:transform 0.2s ease;}");
client.print(".on-button{background-color:#28a745;}"); // Green
client.print(".off-button{background-color:#dc3545;}"); // Red
client.print("a.button:active{transform:scale(0.95);}");
client.print("footer{color:#555;margin-top:40px;}");
client.print("</style>");
// --- CSS STYLING ENDS HERE ---
client.print("</head>");
client.print("<body>");
client.print("<h1>Pollux Labs ESP32 Control</h1>");
client.print("<div class='container'>");
// Card for the temperature sensor
client.print("<div class='card'>");
client.print("<h2>Temperature</h2>");
client.print("<p class='sensor-value'>" + String(temperature, 1) + "<span class='unit'>°C</span></p>");
client.print("</div>");
// Card for the LED control
client.print("<div class='card'>");
client.print("<h2>Lighting</h2>");
client.print("<p class='led-status'>Status: <strong>" + ledStatus + "</strong></p>");
client.print("<div class='buttons'>");
client.print("<a href='/led/on' class='button on-button'>TURN ON</a>");
client.print("<a href='/led/off' class='button off-button'>TURN OFF</a>");
client.print("</div>");
client.print("</div>");
client.print("</div>"); // End .container
client.print("<footer>This page automatically refreshes every 10 seconds.</footer>");
client.print("</body></html>");
client.println();
break;
}
}
}
client.stop();
}
}
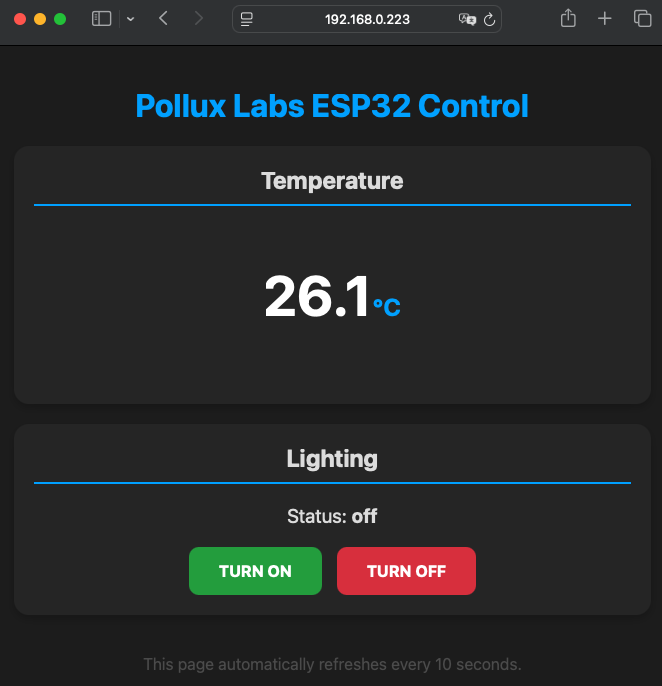
The Result
When you now visit your ESP32’s IP address, you’ll be greeted with a modern interface that looks something like this.
What’s new and why?
<meta name='viewport'...>: This one line in the<head>is the key to responsive design. It tells the smartphone browser, “Hey, don’t view the webpage as a tiny desktop site, but adjust the width to the screen and start without zoom.”.card: Each function gets its own “card.” This creates a nice visual separation. Thanks todisplay:flexin the.container, the cards arrange themselves side-by-side on large screens and automatically stack vertically on narrow screens..sensor-value: We give the temperature reading its own class to make it huge and bold withfont-size—so the most important value immediately catches the eye.- Colored Buttons: The buttons are now not only larger and rounded but also colored. Green for “ON,” red for “OFF.” This is intuitive and looks professional.
Feel free to experiment with the color values (#1e1e1e, #00aaff, etc.) in the CSS section and give the page your own personal touch. Have fun with your new, sleek web interface!
Conclusion
Congratulations! You’ve worked your way up from a simple “Hello World” through LED control to displaying live sensor data. You now have a solid foundation to realize your own, much more complex IoT projects. Imagine being able to remotely control your heating, automate your blinds, or receive an email when your plants need water—all of this is not far off with the knowledge you’ve gained today.
