Streaming radio over the internet is commonplace nowadays – but building your own ESP32 internet radio is certainly special! In this tutorial, you’ll construct your own receiver to stream your favorite stations.
The project is divided into stages: First, you’ll build a basic online radio with an ESP32-S3 Zero, an amplifier module, and a speaker. Then you’ll upgrade the power supply, and finally add a potentiometer that serves as both volume control and power switch for your streaming radio.
Components you’ll need:
1x ESP32-S3 Zero or alternatively another Dual-Core ESP32
1x Adafruit I2S amplifier module
1x Speaker of your choice (max. 3 watts)
1x 3.7 Volt battery (optional)
1x Battery charging module (optional)
1x Potentiometer with switch
Update: This tutorial first teaches you how to build a radio that only streams one station. Further down, you’ll find instructions to expand your ESP32 online radio with station selection and display.
One more update: There is also a tutorial on how to save a currently playing song to Spotify.
Want to hear more about this ESP32 online radio project? Listen to our Google-powered podcast episode:
Setting up the ESP32 Online Radio
Let’s start with the simplest circuit for your streaming radio. You’ll only need the ESP32-S3 Zero (e.g., from Waveshare), the amplifier module, and a speaker. Follow this wiring diagram:

Here’s the connection table again:
| Amplifier Module | ESP32-S3 |
| VIN | ESP32-S3 |
| GND | GND |
| GAIN | GND |
| DIN | GPIO 2 |
| BCLK | GPIO 3 |
| LRC | GPIO 4 |
The amplifier module has a socket for your speaker where you can secure the wires with a screw. Once assembled, your online radio might look like this:

The Sketch for the Internet Radio
The core of your online radio is a library you won’t find in the Arduino IDE’s library manager – but it’s available on GitHub. Download the library as a ZIP file here. Create a new sketch in the Arduino IDE and include it via Sketch > Include Library > Add ZIP Library.
Copy the following sketch, add your WiFi network credentials, and upload it to your ESP32. If you encounter issues with the ESP32-S3 Zero, verify that you’ve selected the correct board. It should work with ESP32 S3 Dev Module. Also, check if you see the entry USB CDC On Boot: “Enabled” in the Tools menu. If it’s set to Disabled, change it accordingly.
In the Tools menu, click on Partition Scheme and select the Huge APP setting. This gives you 3 MB instead of the usual 1.2 MB.
//ESP32 Internet Radio
//https://en.https://en.polluxlabs.net/wp-content/uploads/2020/02/ESP8266-Webserver-small.jpg.net

#include "Arduino.h"
#include "WiFi.h"
#include "Audio.h"

// Connections ESP32 <-> Amplifier
#define I2S_DOUT  2
#define I2S_BCLK  3
#define I2S_LRC   4

Audio audio;

// Wifi Credentials
String ssid =    "YOUR NETWORK";
String password = "YOUR PASSWORD";

void setup() {

  Serial.begin(115200);

  WiFi.disconnect();
  WiFi.mode(WIFI_STA);
  WiFi.begin(ssid.c_str(), password.c_str());

  while (WiFi.status() != WL_CONNECTED) {
    delay(500);
    Serial.print(".");
  }

  Serial.println("");
  Serial.println("WiFi connected");
  Serial.println("IP address: ");
  Serial.println(WiFi.localIP());
  Serial.println("");

  audio.setPinout(I2S_BCLK, I2S_LRC, I2S_DOUT);

  // Volume (0-100)
  audio.setVolume(10);

  // Radio stream, e.g. Byte.fm
  audio.connecttohost("http://www.byte.fm/stream/bytefm.m3u");

}

void loop()

{
  audio.loop();

}

// Print station info

void audio_info(const char *info) {
  Serial.print("info        "); Serial.println(info);
}
void audio_id3data(const char *info) { //id3 metadata
  Serial.print("id3data     "); Serial.println(info);
}
void audio_eof_mp3(const char *info) { //end of file
  Serial.print("eof_mp3     "); Serial.println(info);
}
void audio_showstation(const char *info) {
  Serial.print("station     "); Serial.println(info);
}
void audio_showstreaminfo(const char *info) {
  Serial.print("streaminfo  "); Serial.println(info);
}
void audio_showstreamtitle(const char *info) {
  Serial.print("streamtitle "); Serial.println(info);
}
void audio_bitrate(const char *info) {
  Serial.print("bitrate     "); Serial.println(info);
}
void audio_commercial(const char *info) { //duration in sec
  Serial.print("commercial  "); Serial.println(info);
}
void audio_icyurl(const char *info) { //homepage
  Serial.print("icyurl      "); Serial.println(info);
}
void audio_lasthost(const char *info) { //stream URL played
  Serial.print("lasthost    "); Serial.println(info);
}
void audio_eof_speech(const char *info) {
  Serial.print("eof_speech  "); Serial.println(info);
}
If everything’s set up correctly, you should hear Byte.fm after starting the ESP32 online radio – a member-funded station from Hamburg, Germany that broadcasts alternative programming without ads.
How the Sketch Works
First, you include some libraries. The first two are already in your Arduino IDE, while you’ve downloaded and included the Audio.h library as described earlier.
Then you define which pins connect the amplifier module to the ESP32. You can choose these freely, just remember to update them in the sketch:
#define I2S_DOUT  2
#define I2S_BCLK  3
#define I2S_LRC   4
Next, you create an Audio library object and store your WiFi network credentials. In the setup function, you start the Serial Monitor and connect the ESP32 to WiFi. These two lines are crucial:
audio.setVolume(10);
audio.connecttohost("http://www.byte.fm/stream/bytefm.m3u");
The first sets the stream volume – with a number between 0 and 100. Then you specify the stream address, in this case, Byte.fm. To stream a different station, you can usually find its URL through a quick search.
The loop only has one function: Playing the stream. Lastly, there are some callback functions that trigger on certain events or output information. For example, these provide info about the station or the current track, which appear in your Serial Monitor.
Expanding the Power Supply
Currently, your online radio or ESP32 gets power from your computer or maybe a power bank. Let’s adjust the power supply – either with a battery or at least with the associated charging module. Later, you’ll connect a potentiometer with an integrated switch to this module to turn your ESP32 and thus the radio on and off.
Connecting a Battery
To make your ESP32 online radio independent of power cables, you can install a battery with a charging module. However, an important note: If you’re inexperienced with batteries for Arduino, ESP32, and similar projects, please stick to the cable for an external power source. Also, be sure to follow the manufacturer’s safety instructions, as improper use can lead to fire and even explosions – I assume no warranty or liability for any damages.
If you’re experienced enough, refer to this wiring diagram for building the ESP32 online radio:

With this charging module, you can charge the battery while streaming radio. If you want to charge the battery without listening, install a switch between the charging module and the ESP32 – more on that later. The sketch doesn’t change with this extension.
Using Only the Charging Module
You might wonder why it’s useful to use only the charging module for power – you could keep the USB cable directly in the ESP32. True – but the final upgrade is a potentiometer for switching on/off and volume control. For this to work on the ESP32-S3, you need a connection that you can interrupt with the potentiometer’s switch – that’ll be the one between the charging module and ESP32.
The charging module used in the diagrams has two connections each for plus and minus. One pair (the middle) is for the battery and the other (the outer) is for powering a device, in our case the ESP32.
Connect your ESP32 to the charging module like this:

When you power the charging module via USB, your ESP32 will receive energy and the online radio will start streaming.
All that’s left is the final step – the potentiometer.
Installing the Potentiometer
For this, you need a pot with five pins, not the standard three connections. The outermost two connect to a switch on the pot’s bottom and can interrupt a circuit. In practice, you turn the pot right until you hear the switch click – now current flows (in our case, the ESP32 starts up).
As you keep turning, the pot functions normally, regulating resistance, which you can read as a value in the ESP32. Follow this wiring diagram, noting that the top two connections on the pot are often the outer ones in reality:

As you can see, the positive pole of the charging module goes to the pot and then back to the breadboard to a wire connected to the ESP32. When you turn on the pot, current flows from the charging module to the ESP32.
Extending the Sketch
Now the pot is installed and the on/off mechanism works. However, your ESP32 online radio still lacks volume control. We need to extend the existing sketch with a function that reads the pot’s current value and “maps” it to the stream’s volume.
___STEADY_PAYWALL___
You can achieve this with the following code:
void loop() {
  audio.loop();

  int volumeValue = analogRead(VOLUME_PIN);
  int volume = map(volumeValue, 0, 4095, 0, 21);
  audio.setVolume(volume);
Here you read the pot and use the map() function to “map” its values from 0 to 4095 to a volume from 0 to 21. So the more you turn up the pot, the louder the radio gets – until you reach 21 at the far right. You can enter a higher number that suits your speaker – remember, the range goes up to 100. Finally, you pass the value in the volume variable to the audio.setVolume() function.
The problem with this method is that the audio.loop() function (the stream) is briefly interrupted repeatedly. This causes unpleasant stuttering. We need a more sophisticated method to make the volume adjustment (more or less) interruption-free.
We’ll only read the pot’s value every 500ms and only adjust audio.setVolume() if something has changed (i.e., you’ve turned the pot). We’ll also mathematically smooth the pot’s readings, leading to a gentler adjustment.
If you’ve already installed the pot, upload this sketch to your ESP32:
//ESP32 Internetradio
//https://en.https://en.polluxlabs.net/wp-content/uploads/2020/02/ESP8266-Webserver-small.jpg.net

#include "Arduino.h"
#include "WiFi.h"
#include "Audio.h"

#define I2S_DOUT 2
#define I2S_BCLK 3
#define I2S_LRC 4
#define VOLUME_PIN 5

Audio audio;

const char* ssid = "YOUR NETWORK";
const char* password = "YOUR PASSWORD";

const int SAMPLES = 5;
int volumeReadings[SAMPLES];
int readIndex = 0;
int total = 0;
int average = 0;
unsigned long lastVolumeCheck = 0;
const unsigned long VOLUME_CHECK_INTERVAL = 500; // Check alle 500ms

void setup() {
  Serial.begin(115200);
  pinMode(VOLUME_PIN, INPUT);

  WiFi.disconnect();
  WiFi.mode(WIFI_STA);
  WiFi.begin(ssid, password);

  while (WiFi.status() != WL_CONNECTED) {
    delay(500);
    Serial.print(".");
  }

  Serial.println("\nWiFi connected");
  Serial.println("IP address: " + WiFi.localIP().toString());

  audio.setPinout(I2S_BCLK, I2S_LRC, I2S_DOUT);
  audio.setVolume(10);
  audio.connecttohost("http://www.byte.fm/stream/bytefm.m3u");

  // First reading of the pot
  for (int i = 0; i < SAMPLES; i++) {
    volumeReadings[i] = 0;
  }
}

void loop() {
  audio.loop();

  unsigned long currentMillis = millis();
  if (currentMillis - lastVolumeCheck >= VOLUME_CHECK_INTERVAL) {
    lastVolumeCheck = currentMillis;

    // Remove the last value
    total = total - volumeReadings[readIndex];
    // Read current value
    volumeReadings[readIndex] = analogRead(VOLUME_PIN);
    // Add this value
    total = total + volumeReadings[readIndex];
    // Move to the next value in the array
    readIndex = (readIndex + 1) % SAMPLES;

    // Calculate the average
    average = total / SAMPLES;

    // Map this value
    int volume = map(average, 0, 4095, 0, 31);

    // Adjust value only if the pot was dialed
    static int lastVolume = -1;
    if (volume != lastVolume) {
      audio.setVolume(volume);
      lastVolume = volume;
      Serial.println("Volume set to: " + String(volume));
    }
  }
}

void audio_info(const char *info) {
  Serial.print("info        "); Serial.println(info);
}
void audio_id3data(const char *info) { //id3 metadata
  Serial.print("id3data     "); Serial.println(info);
}
void audio_eof_mp3(const char *info) { //end of file
  Serial.print("eof_mp3     "); Serial.println(info);
}
void audio_showstation(const char *info) {
  Serial.print("station     "); Serial.println(info);
}
void audio_showstreaminfo(const char *info) {
  Serial.print("streaminfo  "); Serial.println(info);
}
void audio_showstreamtitle(const char *info) {
  Serial.print("streamtitle "); Serial.println(info);
}
void audio_bitrate(const char *info) {
  Serial.print("bitrate     "); Serial.println(info);
}
void audio_commercial(const char *info) { //duration in sec
  Serial.print("commercial  "); Serial.println(info);
}
void audio_icyurl(const char *info) { //homepage
  Serial.print("icyurl      "); Serial.println(info);
}
void audio_lasthost(const char *info) { //stream URL played
  Serial.print("lasthost    "); Serial.println(info);
}
void audio_eof_speech(const char *info) {
  Serial.print("eof_speech  "); Serial.println(info);
}
Now you should be able to turn on your ESP32 online radio with the pot and shortly after – without interruption – stream Byte.fm.
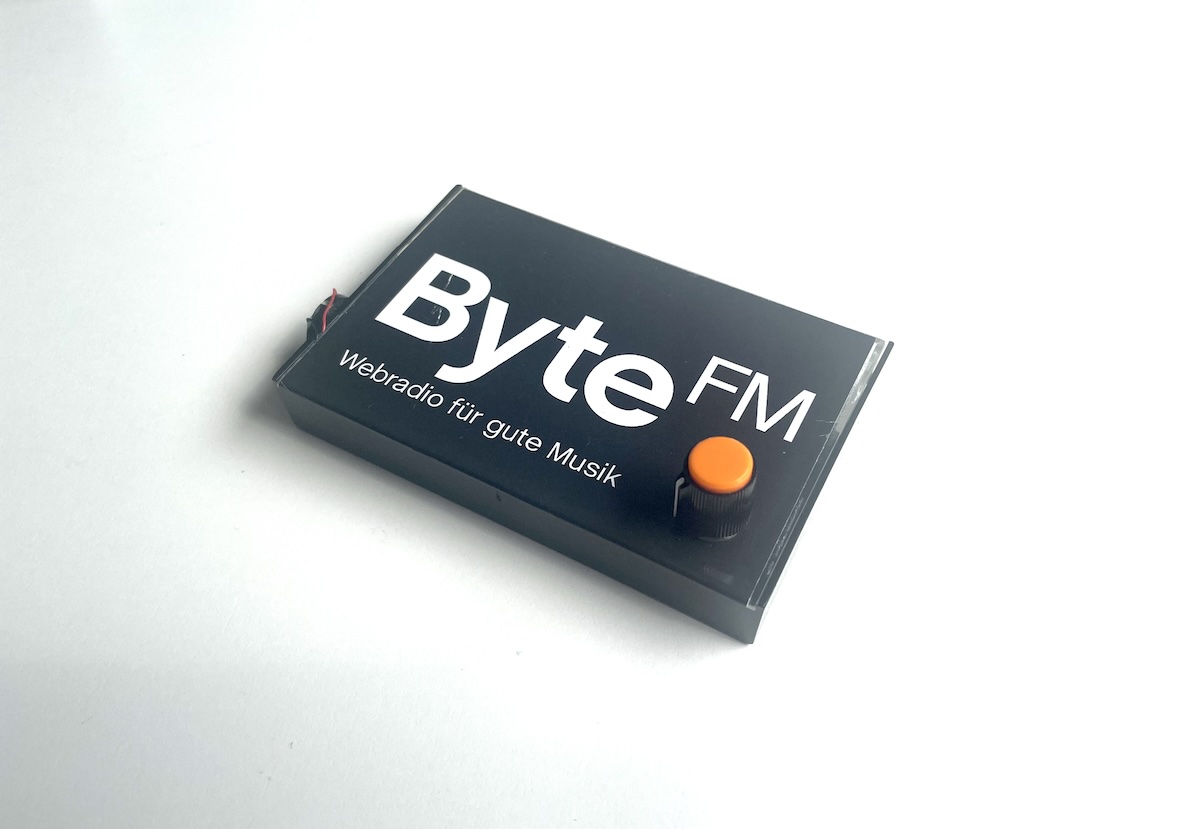
Moving to a Perfboard and Proper Housing
So far, you’ve mounted your ESP32 online radio components on a breadboard. For permanent use and better aesthetics, you need a housing – and probably a more space-efficient method for the components.
An old cassette case works well as housing for the electronics. You can drill holes for the potentiometer and charging cable (if not using a battery) with a saw or file. You can attach the speaker outside or inside, depending on its dimensions.
Your ESP32 online radio could end up looking like this:

Attaching components to a perfboard requires planning and advanced soldering skills. Consider how you’ll attach the ESP32, amplifier, etc., to leave room for the pot and USB port access. The speaker placement is also important.
That covers the “single-station radio”. But what if there’s an ad or a song you can’t stand? Then you need a radio with station selection. Let’s learn how to upgrade your current radio in the next part of this tutorial.
ESP32 Internet Radio with Station Selection
To select different stations on your radio, you need a suitable input method. A rotary encoder (or rotary generator) works well for this. Unlike a smooth pot, it locks into fixed positions and sends corresponding signals to your ESP32. Each turn switches to the next radio station.
Only a small modification is needed on your breadboard:

As you can see, the rotary encoder (bottom right) is also powered by the charging module. Connect the CLK and DT pins to pins 12 and 13.
The Library for the Rotary Encoder
To easily process the rotary encoder’s signals, use the AiEsp32RotaryEncoder library. You can install it via the Arduino IDE’s library manager:

Find Your Favorite Stations
Next, you need a list of stations for your ESP32 online radio to stream. You’ll need the stream URLs. You already know Byte.fm’s URL. You can often find others easily via search engines. Try searching for [station name] + Stream URL.
I’ve stored these four stations in my radio (as an array, which you’ll see in the complete sketch):
const char* stations[] = {
    "http://www.byte.fm/stream/320.m3u", //Byte.fm
    "https://st01.sslstream.dlf.de/dlf/01/128/mp3/stream.mp3", //Deutschlandfunk
    "https://frontend.streamonkey.net/fho-schwarzwaldradiolive/mp3-stream.m3u", //Schwarzwaldradio
    "https://kexp-mp3-128.streamguys1.com/kexp128.mp3" //KEXP
};
The Complete Sketch of the ESP32 Online Radio with Station Selection
Here’s the entire sketch to copy and adapt:
//ESP32 Internet Radio
//https://en.https://en.polluxlabs.net/wp-content/uploads/2020/02/ESP8266-Webserver-small.jpg.net

#include "Arduino.h"
#include "WiFi.h"
#include "Audio.h"
#include "AiEsp32RotaryEncoder.h"

#define I2S_DOUT 2
#define I2S_BCLK 3
#define I2S_LRC 4
#define VOLUME_PIN 5

#define ROTARY_ENCODER_A_PIN 12
#define ROTARY_ENCODER_B_PIN 13
#define ROTARY_ENCODER_BUTTON_PIN 14
#define ROTARY_ENCODER_STEPS 4

AiEsp32RotaryEncoder rotaryEncoder = AiEsp32RotaryEncoder(ROTARY_ENCODER_A_PIN, ROTARY_ENCODER_B_PIN, ROTARY_ENCODER_BUTTON_PIN, -1, ROTARY_ENCODER_STEPS);

Audio audio;

// WiFi credentials
const char* ssid = "YOUR NETWORK";
const char* password = "YOUR PASSWORD";

// Radio stations
const char* stations[] = {
    "http://www.byte.fm/stream/bytefm.m3u",
    "https://st01.sslstream.dlf.de/dlf/01/128/mp3/stream.mp3",
    "https://frontend.streamonkey.net/fho-schwarzwaldradiolive/mp3-stream.m3u",
    "https://kexp-mp3-128.streamguys1.com/kexp128.mp3"
};
const int NUM_STATIONS = sizeof(stations) / sizeof(stations[0]);
int currentStation = 0;

// Volume control variables
const int SAMPLES = 5;
int volumeReadings[SAMPLES];
int readIndex = 0;
int total = 0;
int average = 0;
unsigned long lastVolumeCheck = 0;
const unsigned long VOLUME_CHECK_INTERVAL = 500; // Check every 500ms

void IRAM_ATTR readEncoderISR() {
    rotaryEncoder.readEncoder_ISR();
}

void setup() {
    Serial.begin(115200);
    pinMode(VOLUME_PIN, INPUT);

    // Rotary Encoder setup
    rotaryEncoder.begin();
    rotaryEncoder.setup(readEncoderISR);
    rotaryEncoder.setBoundaries(0, NUM_STATIONS - 1, true); // circular behavior
    rotaryEncoder.setAcceleration(0); // no acceleration

    WiFi.disconnect();
    WiFi.mode(WIFI_STA);
    WiFi.begin(ssid, password);

    while (WiFi.status() != WL_CONNECTED) {
        delay(500);
        Serial.print(".");
    }

    Serial.println("\nWiFi connected");
    Serial.println("IP address: " + WiFi.localIP().toString());

    audio.setPinout(I2S_BCLK, I2S_LRC, I2S_DOUT);
    audio.setVolume(10);
    connectToStation(currentStation);

    // Initialize volume readings
    for (int i = 0; i < SAMPLES; i++) {
        volumeReadings[i] = 0;
    }
}

void loop() {
    audio.loop();
    checkVolumeControl();
    checkStationChange();
}

void checkVolumeControl() {
    unsigned long currentMillis = millis();
    if (currentMillis - lastVolumeCheck >= VOLUME_CHECK_INTERVAL) {
        lastVolumeCheck = currentMillis;

        total = total - volumeReadings[readIndex];
        volumeReadings[readIndex] = analogRead(VOLUME_PIN);
        total = total + volumeReadings[readIndex];
        readIndex = (readIndex + 1) % SAMPLES;

        average = total / SAMPLES;
        int volume = map(average, 0, 4095, 5, 23);

        static int lastVolume = -1;
        if (volume != lastVolume) {
            audio.setVolume(volume);
            lastVolume = volume;
            Serial.println("Volume set to: " + String(volume));
        }
    }
}

void checkStationChange() {
    if (rotaryEncoder.encoderChanged()) {
        int newStation = rotaryEncoder.readEncoder();
        if (newStation != currentStation) {
            currentStation = newStation;
            Serial.println("Changing to station: " + String(currentStation));
            connectToStation(currentStation);
        }
    }

    if (rotaryEncoder.isEncoderButtonClicked()) {
        Serial.println("Encoder button clicked");
        // You can add functionality here for when the encoder button is pressed
    }
}

void connectToStation(int stationIndex) {
    audio.stopSong();
    audio.connecttohost(stations[stationIndex]);
    Serial.println("Connected to: " + String(stations[stationIndex]));
}

// Audio status functions
void audio_info(const char *info) {
    Serial.print("info        "); Serial.println(info);
}
void audio_id3data(const char *info) {
    Serial.print("id3data     "); Serial.println(info);
}
void audio_eof_mp3(const char *info) {
    Serial.print("eof_mp3     "); Serial.println(info);
}
void audio_showstation(const char *info) {
    Serial.print("station     "); Serial.println(info);
}
void audio_showstreaminfo(const char *info) {
    Serial.print("streaminfo  "); Serial.println(info);
}
void audio_showstreamtitle(const char *info) {
    Serial.print("streamtitle "); Serial.println(info);
}
void audio_bitrate(const char *info) {
    Serial.print("bitrate     "); Serial.println(info);
}
void audio_commercial(const char *info) {
    Serial.print("commercial  "); Serial.println(info);
}
void audio_icyurl(const char *info) {
    Serial.print("icyurl      "); Serial.println(info);
}
void audio_lasthost(const char *info) {
    Serial.print("lasthost    "); Serial.println(info);
}
void audio_eof_speech(const char *info) {
    Serial.print("eof_speech  "); Serial.println(info);
}
Before uploading, update your WiFi credentials and enter your favorite stations. After uploading and starting the sketch, you should be able to select stations with the rotary encoder. In my tests, it was necessary to turn twice for the first switch. Afterwards, one turn was enough.
Note: In the sketch, the rotary encoder’s button (often labeled SW on the module) is connected to pin 14. If your encoder has a pushbutton, you can implement another function of your choice in your ESP32 online radio.
On your breadboard, the radio could look like this:

What’s next? While you might recognize stations by the music they’re streaming, a display would be helpful. It could show not only the station name but also the current song. You can find useful functions for this in the above sketch: void audio_showstreaminfo() shows the station name and void audio_showstreamtitle() shows the current song or show name.
Adding an OLED Display to the Radio
Now for the final component of your ESP32 online radio – a small display to show the current station and song. An OLED display with 128×32 pixels* works well. Connect it like this:

With all the wires on your breadboard now, here are the connections in detail:
| OLED Display | ESP32-S3 Zero |
| VCC (3.3V) | 3.3V |
| GND | GND |
| SDA | 8 |
| SCK/SCL | 9 |
That’s it for hardware – now to the sketch. Before uploading, you need to adjust a setting in the Arduino IDE. The following sketch would exceed the standard memory allocation on your ESP32 without freeing up more space. Fortunately, this is simple:
In the Tools menu, click on Partition Scheme and select the Huge APP setting. This gives you 3 MB instead of the usual 1.2 MB.

Now that you have enough memory on the ESP32, let’s upload the sketch. Note: Your ESP32 is quite busy with all the connected peripherals, which might cause unreliable booting. To prevent this, the following sketch initializes the display, WiFi connection, and amplifier step by step. The setup function is now more streamlined.
For your display to show the correct station name for each stream, you need an array with names. Enter the station names in the same order as the stream array:
const char* stationNames[] = {
    "Byte.fm",
    "Deutschlandfunk",
    "Schwarzwaldradio",
    "KEXP",
    "Psychedelic Jukebox"
};
Here’s the complete sketch:
//ESP32 Internet Radio
//https://en.https://en.polluxlabs.net/wp-content/uploads/2020/02/ESP8266-Webserver-small.jpg.net

#include <Arduino.h>
#include <WiFi.h>
#include <Audio.h>
#include <AiEsp32RotaryEncoder.h>
#include <Wire.h>
#include <Adafruit_GFX.h>
#include <Adafruit_SSD1306.h>

#define I2S_DOUT 2
#define I2S_BCLK 3
#define I2S_LRC 4
#define VOLUME_PIN 5

#define ROTARY_ENCODER_A_PIN 12
#define ROTARY_ENCODER_B_PIN 13
#define ROTARY_ENCODER_BUTTON_PIN 14
#define ROTARY_ENCODER_STEPS 4

#define SCREEN_WIDTH 128
#define SCREEN_HEIGHT 32
#define OLED_RESET     -1
#define SCREEN_ADDRESS 0x3C

#define I2C_SDA 8
#define I2C_SCL 9

AiEsp32RotaryEncoder rotaryEncoder(ROTARY_ENCODER_A_PIN, ROTARY_ENCODER_B_PIN, ROTARY_ENCODER_BUTTON_PIN, -1, ROTARY_ENCODER_STEPS);
Adafruit_SSD1306 display(SCREEN_WIDTH, SCREEN_HEIGHT, &Wire, OLED_RESET);

Audio audio;

// WiFi credentials
const char* ssid = "YOUR NETWORK";
const char* password = "YOUR PASSWORD";

// Radio stations
const char* stations[] = {
    "http://www.byte.fm/stream/bytefm.m3u",
    "https://st01.sslstream.dlf.de/dlf/01/128/mp3/stream.mp3",
    "https://frontend.streamonkey.net/fho-schwarzwaldradiolive/mp3-stream.m3u",
    "https://kexp-mp3-128.streamguys1.com/kexp128.mp3",
    "https://eagle.streemlion.com:2199/tunein/psychedelicj.asx"
};
const char* stationNames[] = {
    "Byte.fm",
    "Deutschlandfunk",
    "Schwarzwaldradio",
    "KEXP",
    "Psychedelic Jukebox"
};

const int NUM_STATIONS = sizeof(stations) / sizeof(stations[0]);
int currentStation = 0;

char streamTitle[64] = "";  // Buffer to store the current stream title

// Volume control variables
const int SAMPLES = 5;
int volumeReadings[SAMPLES];
int readIndex = 0;
int total = 0;
int average = 0;
unsigned long lastVolumeCheck = 0;
const unsigned long VOLUME_CHECK_INTERVAL = 500; // Check every 500ms

// Flags für verzögerte Initialisierung
bool isWiFiConnected = false;
bool isDisplayInitialized = false;
bool isAudioInitialized = false;

void IRAM_ATTR readEncoderISR() {
    rotaryEncoder.readEncoder_ISR();
}

String replaceSpecialChars(String input) {
    input.replace("ä", "ae");
    input.replace("ö", "oe");
    input.replace("ü", "ue");
    input.replace("Ä", "AE");
    input.replace("Ö", "OE");
    input.replace("Ü", "UE");
    input.replace("ß", "ss");
    return input;
}

void setup() {
    delay(1000);  // Kurze Pause für stabilen Start
    Serial.begin(115200);
    while(!Serial) { delay(10); }  // Warte auf Serial-Verbindung
    Serial.println(F("ESP32-S3 Internet Radio startet..."));

    pinMode(VOLUME_PIN, INPUT);

    rotaryEncoder.begin();
    rotaryEncoder.setup(readEncoderISR);
    rotaryEncoder.setBoundaries(0, NUM_STATIONS - 1, true);
    rotaryEncoder.setAcceleration(0);

    Serial.println(F("Initialisiere I2C..."));
    Wire.begin(I2C_SDA, I2C_SCL);

    // Initialisiere Volumen-Readings
    for (int i = 0; i < SAMPLES; i++) {
        volumeReadings[i] = 0;
    }
}

void loop() {
    static unsigned long lastInitAttempt = 0;
    const unsigned long initInterval = 5000;  // 5 Sekunden zwischen Initialisierungsversuchen

    // Verzögerte Initialisierung
    if (!isDisplayInitialized && millis() - lastInitAttempt > initInterval) {
        initializeDisplay();
        lastInitAttempt = millis();
    }

    if (!isWiFiConnected && millis() - lastInitAttempt > initInterval) {
        connectToWiFi();
        lastInitAttempt = millis();
    }

    if (isWiFiConnected && !isAudioInitialized && millis() - lastInitAttempt > initInterval) {
        initializeAudio();
        lastInitAttempt = millis();
    }

    // Normale Loop-Funktionalität
    if (isDisplayInitialized && isWiFiConnected && isAudioInitialized) {
        audio.loop();
        checkEncoder();
        checkVolumeControl();
    }

    yield();  // Watchdog füttern
    delay(10);  // Kurze Pause für Stabilität
}

void initializeDisplay() {
    Serial.println(F("Initialisiere OLED Display..."));
    if(!display.begin(SSD1306_SWITCHCAPVCC, SCREEN_ADDRESS)) {
        Serial.println(F("SSD1306 Initialisierung fehlgeschlagen"));
        return;
    }
    display.clearDisplay();
    display.setTextSize(1);
    display.setTextColor(SSD1306_WHITE);
    display.setCursor(0,0);
    display.println(F("Initialisierung..."));
    display.display();
    isDisplayInitialized = true;
    Serial.println(F("OLED Display initialisiert"));
}

void connectToWiFi() {
    Serial.println(F("Verbinde mit WiFi..."));
    WiFi.begin(ssid, password);
    int attempts = 0;
    while (WiFi.status() != WL_CONNECTED && attempts < 20) {
        delay(500);
        Serial.print(".");
        attempts++;
    }
    if (WiFi.status() == WL_CONNECTED) {
        Serial.println(F("\nWiFi verbunden"));
        isWiFiConnected = true;
        if (isDisplayInitialized) {
            display.clearDisplay();
            display.setCursor(0,0);
            display.println(F("WiFi verbunden"));
            display.display();
        }
    } else {
        Serial.println(F("\nWiFi-Verbindung fehlgeschlagen"));
    }
}

void initializeAudio() {
    audio.setPinout(I2S_BCLK, I2S_LRC, I2S_DOUT);
    audio.setVolume(10);
    connectToStation(currentStation);
    isAudioInitialized = true;
    Serial.println(F("Audio initialisiert"));
}

void checkEncoder() {
    if (rotaryEncoder.encoderChanged()) {
        currentStation = rotaryEncoder.readEncoder();
        connectToStation(currentStation);
    }

    if (rotaryEncoder.isEncoderButtonClicked()) {
        Serial.println(F("Encoder-Taste gedrückt"));
        // Hier könnte eine Aktion für den Tastendruck implementiert werden
    }
}

void connectToStation(int stationIndex) {
    audio.stopSong();
    audio.connecttohost(stations[stationIndex]);
    updateDisplay();
}

void checkVolumeControl() {
    unsigned long currentMillis = millis();
    if (currentMillis - lastVolumeCheck >= VOLUME_CHECK_INTERVAL) {
        lastVolumeCheck = currentMillis;

        total = total - volumeReadings[readIndex];
        volumeReadings[readIndex] = analogRead(VOLUME_PIN);
        total = total + volumeReadings[readIndex];
        readIndex = (readIndex + 1) % SAMPLES;

        average = total / SAMPLES;
        int volume = map(average, 0, 4095, 5, 23);

        static int lastVolume = -1;
        if (volume != lastVolume) {
            audio.setVolume(volume);
            lastVolume = volume;
            Serial.println("Lautstärke eingestellt auf: " + String(volume));
            updateDisplay();
        }
    }
}

void updateDisplay() {
    if (!isDisplayInitialized) return;
    display.clearDisplay();
    display.setCursor(0,0);
    display.println(replaceSpecialChars(String(stationNames[currentStation])));
    display.println();
    display.println(replaceSpecialChars(String(streamTitle)));
    display.display();
    Serial.println(F("Display aktualisiert"));
}

// Audio callback functions
void audio_info(const char *info) {
    Serial.print("info        "); Serial.println(info);
}
void audio_id3data(const char *info) {
    Serial.print("id3data     "); Serial.println(info);
}
void audio_eof_mp3(const char *info) {
    Serial.print("eof_mp3     "); Serial.println(info);
}
void audio_showstation(const char *info) {
    Serial.print("station     "); Serial.println(info);
}
void audio_showstreaminfo(const char *info) {
    Serial.print("streaminfo  "); Serial.println(info);
}
void audio_showstreamtitle(const char *info) {
    Serial.print("streamtitle: "); Serial.println(info);
    strncpy(streamTitle, info, sizeof(streamTitle) - 1);
    streamTitle[sizeof(streamTitle) - 1] = '\0'; // Ensure null-termination
    updateDisplay();
}
void audio_bitrate(const char *info) {
    Serial.print("bitrate     "); Serial.println(info);
}
void audio_commercial(const char *info) {
    Serial.print("commercial  "); Serial.println(info);
}
void audio_icyurl(const char *info) {
    Serial.print("icyurl      "); Serial.println(info);
}
void audio_lasthost(const char *info) {
    Serial.print("lasthost    "); Serial.println(info);
}
void audio_eof_speech(const char *info) {
    Serial.print("eof_speech  "); Serial.println(info);
}
After uploading, your ESP32 online radio should start (which now takes longer) and stream the first station in your list. The display shows the stored station name and – if available – the name of the song or show currently streaming.
And that’s it! Enjoy tinkering with your new ESP32 online radio! 🙂
Update (April 2025): Buffer
If you’re experiencing stability issues with one or more streams, a buffer can help. This instability could be due to unreliable WiFi at your location or an inconsistent streaming source. With buffering, audio data is temporarily stored so that if there’s an interruption, you have some data in reserve to bridge the gap until the stream resumes. This can smooth out minor interruptions so you don’t notice them at all.
The available memory in the provided sketch is 32KB. This size is sufficient for approximately 2 seconds of a standard 128 kbit/s stream. If your internet connection or the stream itself cuts out for longer than that, you will still experience interruptions even with the following sketch.
//ESP32 Internet Radio with improved buffer
//https://en.https://en.polluxlabs.net/wp-content/uploads/2020/02/ESP8266-Webserver-small.jpg.net

#include <Arduino.h>
#include <WiFi.h>
#include <Audio.h>
#include <AiEsp32RotaryEncoder.h>
#include <Wire.h>
#include <Adafruit_GFX.h>
#include <Adafruit_SSD1306.h>

// Pin definitions
#define I2S_DOUT 2
#define I2S_BCLK 3
#define I2S_LRC 4
#define VOLUME_PIN 5
#define ROTARY_ENCODER_A_PIN 12
#define ROTARY_ENCODER_B_PIN 13
#define ROTARY_ENCODER_BUTTON_PIN 14
#define ROTARY_ENCODER_STEPS 4

// Display definitions
#define SCREEN_WIDTH 128
#define SCREEN_HEIGHT 32
#define OLED_RESET     -1
#define SCREEN_ADDRESS 0x3C
#define I2C_SDA 8
#define I2C_SCL 9

// Buffer configuration
#define AUDIO_BUFFER_SIZE 32768  // Increased buffer (standard is 16KB)

// Library instances
AiEsp32RotaryEncoder rotaryEncoder(ROTARY_ENCODER_A_PIN, ROTARY_ENCODER_B_PIN, ROTARY_ENCODER_BUTTON_PIN, -1, ROTARY_ENCODER_STEPS);
Adafruit_SSD1306 display(SCREEN_WIDTH, SCREEN_HEIGHT, &Wire, OLED_RESET);
Audio audio;

// WiFi credentials
const char* ssid = "YOUR NETWORK";
const char* password = "YOUR PASSWORD";

// Radio stations
const char* stations[] = {
    "http://www.byte.fm/stream/bytefm.m3u",
    "https://st01.sslstream.dlf.de/dlf/01/128/mp3/stream.mp3",
    "https://frontend.streamonkey.net/fho-schwarzwaldradiolive/mp3-stream.m3u",
    "https://kexp-mp3-128.streamguys1.com/kexp128.mp3",
    "https://eagle.streemlion.com:2199/tunein/psychedelicj.asx"
};

const char* stationNames[] = {
    "Byte.fm",
    "Deutschlandfunk",
    "Schwarzwaldradio",
    "KEXP",
    "Psychedelic Jukebox"
};

const int NUM_STATIONS = sizeof(stations) / sizeof(stations[0]);
int currentStation = 0;
char streamTitle[64] = "";  // Buffer to store the current stream title

// Buffer status and connection monitoring
uint32_t bufferFillLevel = 0;
uint32_t bufferMaxSize = AUDIO_BUFFER_SIZE;
unsigned long lastBufferUpdate = 0;
const unsigned long BUFFER_UPDATE_INTERVAL = 1000; // Update buffer info every second
bool streamActive = false;
unsigned long lastStreamCheckTime = 0;
const unsigned long STREAM_CHECK_INTERVAL = 10000; // Check stream every 10 seconds
unsigned long lastAudioDataTime = 0; // Timestamp of last audio data

// Volume control variables
const int SAMPLES = 5;
int volumeReadings[SAMPLES];
int readIndex = 0;
int total = 0;
int average = 0;
unsigned long lastVolumeCheck = 0;
const unsigned long VOLUME_CHECK_INTERVAL = 500; // Check every 500ms

// Flags for delayed initialization
bool isWiFiConnected = false;
bool isDisplayInitialized = false;
bool isAudioInitialized = false;

void IRAM_ATTR readEncoderISR() {
    rotaryEncoder.readEncoder_ISR();
}

String replaceSpecialChars(String input) {
    input.replace("ä", "ae");
    input.replace("ö", "oe");
    input.replace("ü", "ue");
    input.replace("Ä", "AE");
    input.replace("Ö", "OE");
    input.replace("Ü", "UE");
    input.replace("ß", "ss");
    return input;
}

void setup() {
    delay(1000);  // Short pause for stable start
    Serial.begin(115200);
    while(!Serial) { delay(10); }  // Wait for Serial connection
    Serial.println(F("ESP32-S3 Internet Radio starting..."));

    pinMode(VOLUME_PIN, INPUT);

    rotaryEncoder.begin();
    rotaryEncoder.setup(readEncoderISR);
    rotaryEncoder.setBoundaries(0, NUM_STATIONS - 1, true);
    rotaryEncoder.setAcceleration(0);

    Serial.println(F("Initializing I2C..."));
    Wire.begin(I2C_SDA, I2C_SCL);

    // Initialize volume readings
    for (int i = 0; i < SAMPLES; i++) {
        volumeReadings[i] = 0;
    }
}

void loop() {
    static unsigned long lastInitAttempt = 0;
    const unsigned long initInterval = 5000;  // 5 seconds between initialization attempts

    // Delayed initialization
    if (!isDisplayInitialized && millis() - lastInitAttempt > initInterval) {
        initializeDisplay();
        lastInitAttempt = millis();
    }

    if (!isWiFiConnected && millis() - lastInitAttempt > initInterval) {
        connectToWiFi();
        lastInitAttempt = millis();
    }

    if (isWiFiConnected && !isAudioInitialized && millis() - lastInitAttempt > initInterval) {
        initializeAudio();
        lastInitAttempt = millis();
    }

    // Normal loop functionality
    if (isDisplayInitialized && isWiFiConnected && isAudioInitialized) {
        audio.loop();
        checkEncoder();
        checkVolumeControl();
        updateBufferStatus();
        checkStreamStatus();
    }

    // Check WiFi connection and restore if needed
    if (isWiFiConnected && WiFi.status() != WL_CONNECTED) {
        Serial.println(F("WiFi connection lost. Trying to reconnect..."));
        isWiFiConnected = false;
    }

    yield();  // Feed watchdog
    delay(10);  // Short pause for stability
}

void initializeDisplay() {
    Serial.println(F("Initializing OLED Display..."));
    if(!display.begin(SSD1306_SWITCHCAPVCC, SCREEN_ADDRESS)) {
        Serial.println(F("SSD1306 initialization failed"));
        return;
    }

    display.clearDisplay();
    display.setTextSize(1);
    display.setTextColor(SSD1306_WHITE);
    display.setCursor(0,0);
    display.println(F("Initializing..."));
    display.display();

    isDisplayInitialized = true;
    Serial.println(F("OLED Display initialized"));
}

void connectToWiFi() {
    Serial.println(F("Connecting to WiFi..."));

    // Improve WiFi connection quality
    WiFi.disconnect();
    WiFi.mode(WIFI_STA);
    WiFi.setSleep(false);  // Disable sleep mode for better connection

    WiFi.begin(ssid, password);

    int attempts = 0;
    while (WiFi.status() != WL_CONNECTED && attempts < 20) {
        delay(500);
        Serial.print(".");
        attempts++;
    }

    if (WiFi.status() == WL_CONNECTED) {
        Serial.println(F("\nWiFi connected"));
        Serial.print(F("IP address: "));
        Serial.println(WiFi.localIP());

        isWiFiConnected = true;

        if (isDisplayInitialized) {
            display.clearDisplay();
            display.setCursor(0,0);
            display.println(F("WiFi connected"));
            display.setCursor(0,10);
            display.print(F("IP: "));
            display.println(WiFi.localIP().toString());
            display.display();
            delay(1000);
        }
    } else {
        Serial.println(F("\nWiFi connection failed"));
    }
}

void initializeAudio() {
    // Configure I2S pins
    audio.setPinout(I2S_BCLK, I2S_LRC, I2S_DOUT);
    audio.setVolume(10);

    // Versuche die Buffer-Größe mit der öffentlich zugänglichen Methode zu setzen
    audio.setBufferSize(AUDIO_BUFFER_SIZE);

    connectToStation(currentStation);
    streamActive = true;
    isAudioInitialized = true;

    Serial.println(F("Audio initialized with enlarged buffer"));
    Serial.printf("Buffer size set to: %d bytes\n", AUDIO_BUFFER_SIZE);
}

void checkEncoder() {
    if (rotaryEncoder.encoderChanged()) {
        currentStation = rotaryEncoder.readEncoder();
        connectToStation(currentStation);
    }

    if (rotaryEncoder.isEncoderButtonClicked()) {
        Serial.println(F("Encoder button pressed"));
        // Here an action for the button press could be implemented
        // e.g. Reconnect to the current stream
        reconnectCurrentStation();
    }
}

void connectToStation(int stationIndex) {
    audio.stopSong();
    delay(100);

    // More time to empty the buffer
    for(int i=0; i<5; i++) {
        audio.loop();
        delay(50);
    }

    Serial.print(F("Connecting to station: "));
    Serial.println(stationNames[stationIndex]);

    audio.connecttohost(stations[stationIndex]);
    streamActive = true;
    strcpy(streamTitle, "Connecting...");
    updateDisplay();
}

void reconnectCurrentStation() {
    Serial.println(F("Reconnecting to current stream..."));
    connectToStation(currentStation);
}

void checkVolumeControl() {
    unsigned long currentMillis = millis();
    if (currentMillis - lastVolumeCheck >= VOLUME_CHECK_INTERVAL) {
        lastVolumeCheck = currentMillis;

        total = total - volumeReadings[readIndex];
        volumeReadings[readIndex] = analogRead(VOLUME_PIN);
        total = total + volumeReadings[readIndex];
        readIndex = (readIndex + 1) % SAMPLES;
        average = total / SAMPLES;

        int volume = map(average, 0, 4095, 5, 23);
        static int lastVolume = -1;

        if (volume != lastVolume) {
            audio.setVolume(volume);
            lastVolume = volume;
            Serial.println("Volume set to: " + String(volume));
            updateDisplay();
        }
    }
}

void updateBufferStatus() {
    unsigned long currentMillis = millis();
    if (currentMillis - lastBufferUpdate >= BUFFER_UPDATE_INTERVAL) {
        lastBufferUpdate = currentMillis;

        // Query audio buffer status (if available)
        // These methods are only used if they are available
        #ifdef ESP_ARDUINO_VERSION_MAJOR
        // For newer audio library versions
        // The following lines are only compiled if the functions are available
        #if __has_include("AudioProcessorInfo.h")
            bufferFillLevel = audio.inBufferFilled();
            bufferMaxSize = audio.inBufferSize();

            // Output buffer fill level
            int bufferPercent = (bufferFillLevel * 100) / bufferMaxSize;
            Serial.print(F("Buffer: "));
            Serial.print(bufferPercent);
            Serial.print(F("% ("));
            Serial.print(bufferFillLevel);
            Serial.print(F("/"));
            Serial.print(bufferMaxSize);
            Serial.println(F(")"));
        #endif
        #endif

        // Check WiFi status
        Serial.print(F("WiFi RSSI: "));
        Serial.print(WiFi.RSSI());
        Serial.println(F(" dBm"));

        // Update display with information
        updateDisplayWithBuffer();
    }
}

void checkStreamStatus() {
    unsigned long currentMillis = millis();
    if (currentMillis - lastStreamCheckTime >= STREAM_CHECK_INTERVAL) {
        lastStreamCheckTime = currentMillis;

        // Check if the stream is still active
        bool needsReconnect = false;

        // In newer library versions: Check buffer fill level
        #ifdef ESP_ARDUINO_VERSION_MAJOR
        #if __has_include("AudioProcessorInfo.h")
        if (streamActive && bufferFillLevel == 0) {
            // Buffer is empty, probably connection problem
            Serial.println(F("Stream interrupted - Buffer empty. Trying reconnect..."));
            needsReconnect = true;
        }
        #endif
        #endif

        // Alternative method for older library versions:
        // If we haven't received audio data for a long time
        if(strcmp(streamTitle, "Connecting...") == 0 && (millis() - lastAudioDataTime > 15000)) {
            Serial.println(F("No audio data received. Trying reconnect..."));
            needsReconnect = true;
        }

        // If WiFi signal is very weak, also reconnect
        if(WiFi.RSSI() < -85) {
            Serial.println(F("WiFi signal very weak. Trying reconnect..."));
            needsReconnect = true;
        }

        if(needsReconnect) {
            reconnectCurrentStation();
        }
    }
}

void updateDisplay() {
    if (!isDisplayInitialized) return;

    display.clearDisplay();
    display.setCursor(0,0);
    display.println(replaceSpecialChars(String(stationNames[currentStation])));
    display.println();
    display.println(replaceSpecialChars(String(streamTitle)));
    display.display();
}

// This function now just calls updateDisplay() to keep display simple
void updateDisplayWithBuffer() {
    updateDisplay();
}

// Audio callback functions
void audio_info(const char *info) {
    Serial.print("info        "); Serial.println(info);
}

void audio_id3data(const char *info) {
    Serial.print("id3data     "); Serial.println(info);
}

void audio_eof_mp3(const char *info) {
    Serial.print("eof_mp3     "); Serial.println(info);
    streamActive = false;
}

void audio_showstation(const char *info) {
    Serial.print("station     "); Serial.println(info);
}

void audio_showstreaminfo(const char *info) {
    Serial.print("streaminfo  "); Serial.println(info);
}

void audio_showstreamtitle(const char *info) {
    Serial.print("streamtitle: "); Serial.println(info);
    strncpy(streamTitle, info, sizeof(streamTitle) - 1);
    streamTitle[sizeof(streamTitle) - 1] = '\0'; // Ensure null-termination
    lastAudioDataTime = millis(); // Update timestamp
    updateDisplayWithBuffer();
}

void audio_bitrate(const char *info) {
    Serial.print("bitrate     "); Serial.println(info);
}

void audio_commercial(const char *info) {
    Serial.print("commercial  "); Serial.println(info);
}

void audio_icyurl(const char *info) {
    Serial.print("icyurl      "); Serial.println(info);
}

void audio_lasthost(const char *info) {
    Serial.print("lasthost    "); Serial.println(info);
}

void audio_eof_speech(const char *info) {
    Serial.print("eof_speech  "); Serial.println(info);
}